
Growing Food in Southern Lakes - July Edition: raised beds, manures and perennial propagation
Growing food in the Southern Lakes just got easier. Fifteen local growers, brought together by the Southern Lakes Kai Collective, are teaming up to share what actually works in our climate, helping beginners get started with confidence.
Whether you are renting, working with pots or planter boxes, or growing on a small patch of land, now is the time to begin.
This monthly blog brings together practical, seasonal knowledge from across the region to help households grow food, forage, and build up their pantry for the year ahead. Each edition offers clear, usable guidance for different growing spaces, from a single pot or sunny windowsill through to a productive garden bed.
For our first winter month, the focus is on how to build a raised garden bed, using animal manures, and propagating perennial plants, along with seed raising basics. We also learn about Strawberry Tree berries, and you'll find a fabulous recipe to use up any of your pumpkin and apples.
Winter has arrived, but there’s still plenty you can do in the garden!
Brought to you by the Southern Lakes Kai Collective
〰️
Brought to you by the Southern Lakes Kai Collective 〰️
Your July challenge!
Choose one… or more!
Build a raised garden bed
Source some animal manure
Propagate a perennial plant: herbs, rhubarb, artichokes, berry bushes
Learn about seed raising basics
Find some Strawberry tree berries
Make a delicious apple pumpkin jam
Attend one of Erin’s gardening workshops this July
-
How to Build a Raised Garden Bed
Raised garden beds are one of the easiest upgrades you can make to a home garden. They drain better than ground-level beds, warm up faster in spring, keep weeds at bay, and save your back from constant bending. Here's how to put one together.
Choosing your site and prepping your soil
We've covered site selection and soil preparation in detail in our May edition — head there first if you haven't already sorted your spot or built up your soil foundation. As a quick reminder: keep beds to a maximum of 1m wide so you can comfortably reach the centre from either side. If you're building more than one, leave 50-60cm between them for walkways.
Choosing your timber
There's often confusion between tanalised timber and macrocarpa, so it's worth being clear: tanalised timber is pine that's been pressure-treated with chemical preservatives, while macrocarpa is naturally rot-resistant without any chemical treatment at all. We'd recommend skipping tanalised timber for food growing — it's not worth the risk of chemicals leaching into the soil your vegetables grow in.
Untreated macrocarpa is the best choice for raised beds in New Zealand conditions: chemical-free, and good for 10-15 years even with regular soil contact. For the best longevity, go for fatter sleepers (commonly sold in 150x100mm or 200x100mm) rather than thin boards, which will break down faster. Macrocarpa sleepers are available through timber mills and landscape suppliers — Diana from the Hawea Food Forest recommends Clutha Mobile Milling, who supply both raw timber and kitset raised beds; her original kitset beds are still going strong after about 10 years.
Untreated Douglas fir is a solid alternative, though it won't last quite as long, generally 3-5 years in ground contact.
Plain untreated pine is the shortest-lived option, typically lasting somewhere between 2 and 5 years — fine for a short-term garden, but expect to rebuild sooner.
To line or not to line?
If you're using untreated timber, there's no need to line your bed with plastic. Plastic can be a handy short-term tool — for example, to smother a stubborn patch of couch grass before you get started — but once your bed is established, lining it long-term risks unknown chemicals leaching into your soil over time. Our group of local growers favours steering clear of plastic lining where possible, and using non-treated wood instead.
Other materials worth considering
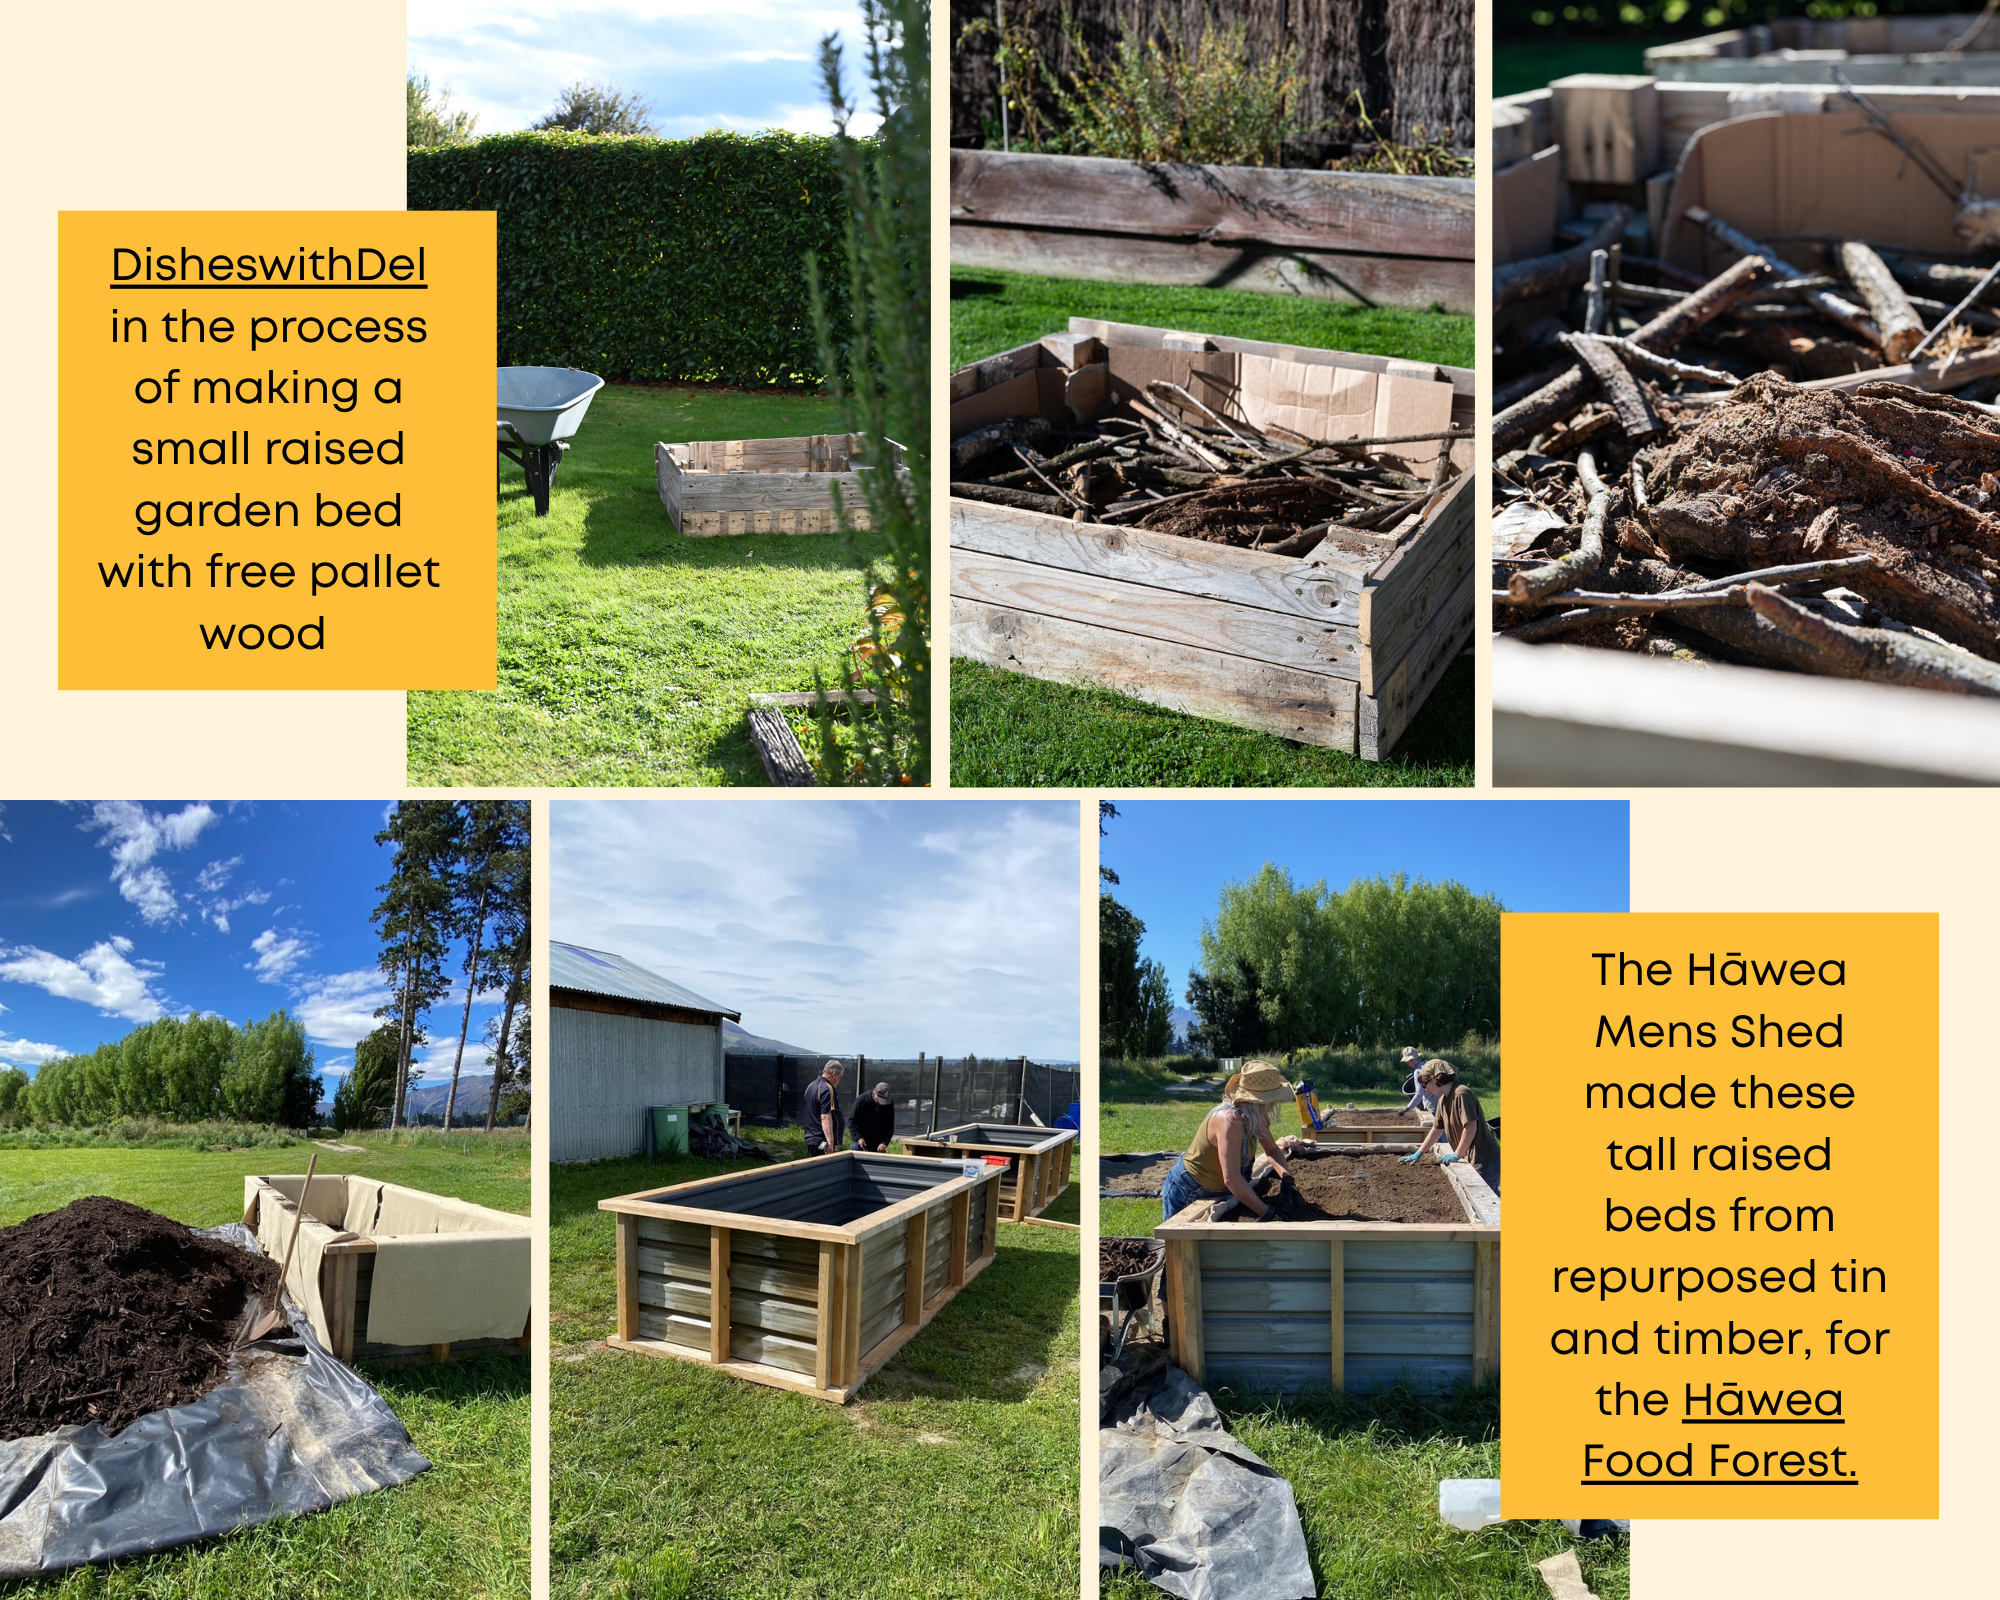
Timber isn't your only option. Corrugated iron is another sturdy material for raised beds (galvanized steel is food-safe). The Hawea Men's Shed used recycled corrugated iron to build raised beds for the Hāwea Food Forest, lined with eco jute, filled with twiggy mulch and topped with soil and compost. They've worked well, and the extra height makes them a great option for anyone with back or mobility issues.
Repurposed pallets are another great low-cost, sustainable option, since they're often discarded in large numbers on building sites. Grow Wanaka built 24 free raised beds for their greenhouse using heat-treated pallets as the frame, corrugated iron on the outside, and cardboard lining the inside to help retain moisture. If you want a step-by-step guide to building with pallets, check out Dishes with Del's video on building a budget raised bed from repurposed heat-treated pallets.
Before using any pallet, check the stamp on the side: look for HT (heat treated, safe) or KD (kiln dried, safe). Avoid anything stamped MB (chemically fumigated) or with no stamp at all, since you can't be sure how it was treated.
Tools and materials
You'll need: timber, iron, or pallets (cut to length), a drill, screws or galvanised corner brackets, a spirit level, a tape measure, and cardboard for the base.
Building the bed
Mark out your site and check it's level, adjusting with a spade if needed.
Lay cardboard first to suppress any grass or weeds underneath.
Cut your materials to length if they aren't pre-cut.
Assemble the frame using corner brackets or screws, checking each corner is square as you go.
Position the frame on site and double-check its level and sits flush with the ground.
Add support pegs along longer sides if your bed is over about 1.8m long, to stop the walls bowing once filled.
Alternatively, any landscaper, builder or handy person can build garden beds - just make sure they use untreated timber.
Filling and finishing
Once your frame is built, you're ready to fill it. We've covered the best soil and compost mix for raised beds in a previous post (see our May edition) — check that out before you start filling, so your bed is planting-ready from day one.
Resources:
Where to find heat-treated pallets in the district
You can find free pallets in many places in the district. Ballantyne Road in Wānaka often has piles of them on the side of the road. Or you can ask Placemakers if you can take some of their (usually gigantic) pile. Just remember: before using any pallet, check the stamp on the side: look for HT (heat treated, safe) or KD (kiln dried, safe). Avoid anything stamped MB (chemically fumigated) or with no stamp at all, since you can't be sure how it was treated.
Where to buy timber for raised garden beds
Clutha Mobile Milling — delivers locally, untreated macrocarpa. Call 0274 430 876.
Pankhurst sawmilling in Riverton sell macrocarpa. Call 03 234 8390
You can also check the Wastebusters Reuse Yard in Wānaka for second-hand bricks, corrugated iron, or other reclaimed materials that can be repurposed into a raised bed.
Step-by-step guide to building with pallets
Dishes with Del's video on building a budget raised bed from repurposed heat-treated pallets.
Alternative ready-made garden bed structures
Mitre 10 and Bunnings both sell raised garden bed kitsets — just check the product description to make sure the timber is untreated before you buy, and avoid plastic planters if possible.
-
Contributed by Erin Allison (Harvest Homegrown)
It's manure season. With leaves down and beds being built up for spring, manure is one of the most useful and most abundant materials you can get your hands on right now. But not all manure is ready to go straight on the garden, and knowing which is which will save you a weedy headache later.
Horse manure
This is the manure you'll see everywhere — bagged up and sold roadside all over the district, usually cheap and sometimes free. The catch: horses don't digest seeds well, so their manure is often loaded with weed seed.
Erin's tip: don't put it straight on the garden. Bag it up in black rubbish bags with a bit of moisture in each bag, then leave it for a few months. It'll heat up inside the bag and break down, taking most of the weed seed viability with it. After that, it's ready for the compost or straight into the garden. Alternatively, you can also add it to your hot compost pile and let it be processed in the pile.
How much: once composted, around 8–10 handfuls spread over a 1m² bed and slightly dug in.
Chicken manure
Too strong to use fresh — it's high in nitrogen and will burn plants if applied directly. Compost it first, either on its own or mixed through your regular compost pile, before it goes anywhere near your beds.
How much: chicken manure is by far the most concentrated — half a handful per 1m² bed is plenty, even once composted. More than that risks overfeeding the soil.
Cow manure
Gentler than chicken or horse, but still benefits from some prep. Either compost it, or turn it into a slurry — mix a few handfuls of manure with enough water to loosen it to a spreadable, porridge-like consistency (roughly 1 part manure to 1 part water as a starting point, adjusting with more water if it's still too thick to pour or spread easily). This is much easier to apply evenly across a bed than dumping solid manure in clumps.
How much: aim for around 8–10 handfuls of manure total (mixed into your slurry) per 1m² bed.
Pellet manures
Naturally pelletised manures — like sheep or alpaca — can generally go straight onto the garden. Sprinkle them over the surface rather than dumping in piles.
How much: around 10 handfuls per 1m² bed, scattered evenly over the surface.
Erin's rule of thumb: if you can see chunky bits in any manure, treat those bits with suspicion — chunks usually mean there's still viable weed seed or root material in there. Heat-treat or hot compost those bits before using, even if the rest of the bag looks fine.
Timing: since most people are building beds now and won't plant for around two months, there should be enough resting time for most manures — even the weedier ones — to settle down before spring planting begins.
A note for organic gardeners: Be aware of where your manure is coming from. If animals have recently been drenched/wormed etc. then the medication will still be viable in the animals manure, which can then affect the soil life in your garden and compost heaps. You need to let it sit for a minimum of 4 months to allow active medication to break down and become inactive. Keep it completely separate from your garden and compost during this time.
A note on shop-bought manure: If you're not getting manure from an animal owner, garden centres like Mitre 10 and Bunnings sell bagged sheep pellets or chicken & sheep pellet blends. These have already been through processing (heated and compressed into pellets) before they hit the shelf, so they're weed-free and ready to use straight away — no composting or heat-treating needed. Just follow the application rate on the bag (usually a handful or two per square metre, dug in and watered well).
Credit: Dishes with Del and Hāwea Food Forest
-
Outdoors
This month you can still get your garlic in the ground if you haven’t already, along with strawberries and broad beans. Check out our June edition on how to.
Apart from these, we advise holding off on most outdoor planting until the beginning of August, as low daylight hours mean there is very little active growth through this period. Waiting a little longer will give your spring crops a stronger and more reliable start.
But you can definitely propagate some of the wonderful perennials that grow well in our region, and if you don't already have herbs, rhubarb, artichokes, or berries, ask around, since neighbours dividing or pruning their own plants will often have spare roots or clumps to give away. With just a bit of care and regular feeding, perennial plants will give you food year after year. Our local food growers explain how to propagate these beautiful plants:
Perennial herbs
Contributed by Erin Allison (Harvest Homegrown)
Winter is a great time to split, trim or reposition perennial herbs in your garden.
Mint roots spread each season, so containers can quickly become overloaded with roots. Remove at least half of it, split up the root ball, and replant back into replenished soil. Mint will reroot very easily and spread if you aren't careful, so be careful how you dispose of the bits you remove — pot them up to give away to others, rot them in a bucket of water, burn them in a fire, or bag them up and put them in the bin.
Chive clumps can be split, or just trimmed right down to ground level to remove any damaged foliage.
Trim all your herbs ready for fresh spring growth, and remove any excess of those that have spread or got away on you.
Parsley plants are best in their first year, so unless you want them for seed, it's a good time to get rid of old plants.
Watch for seedlings popping up from the seed drop of your herbs in early spring, and replant or remove them if needed.
Rhubarb
Contributed by Erin Allison (Harvest Homegrown) and Emberly Wetherall (Grow Wānaka)
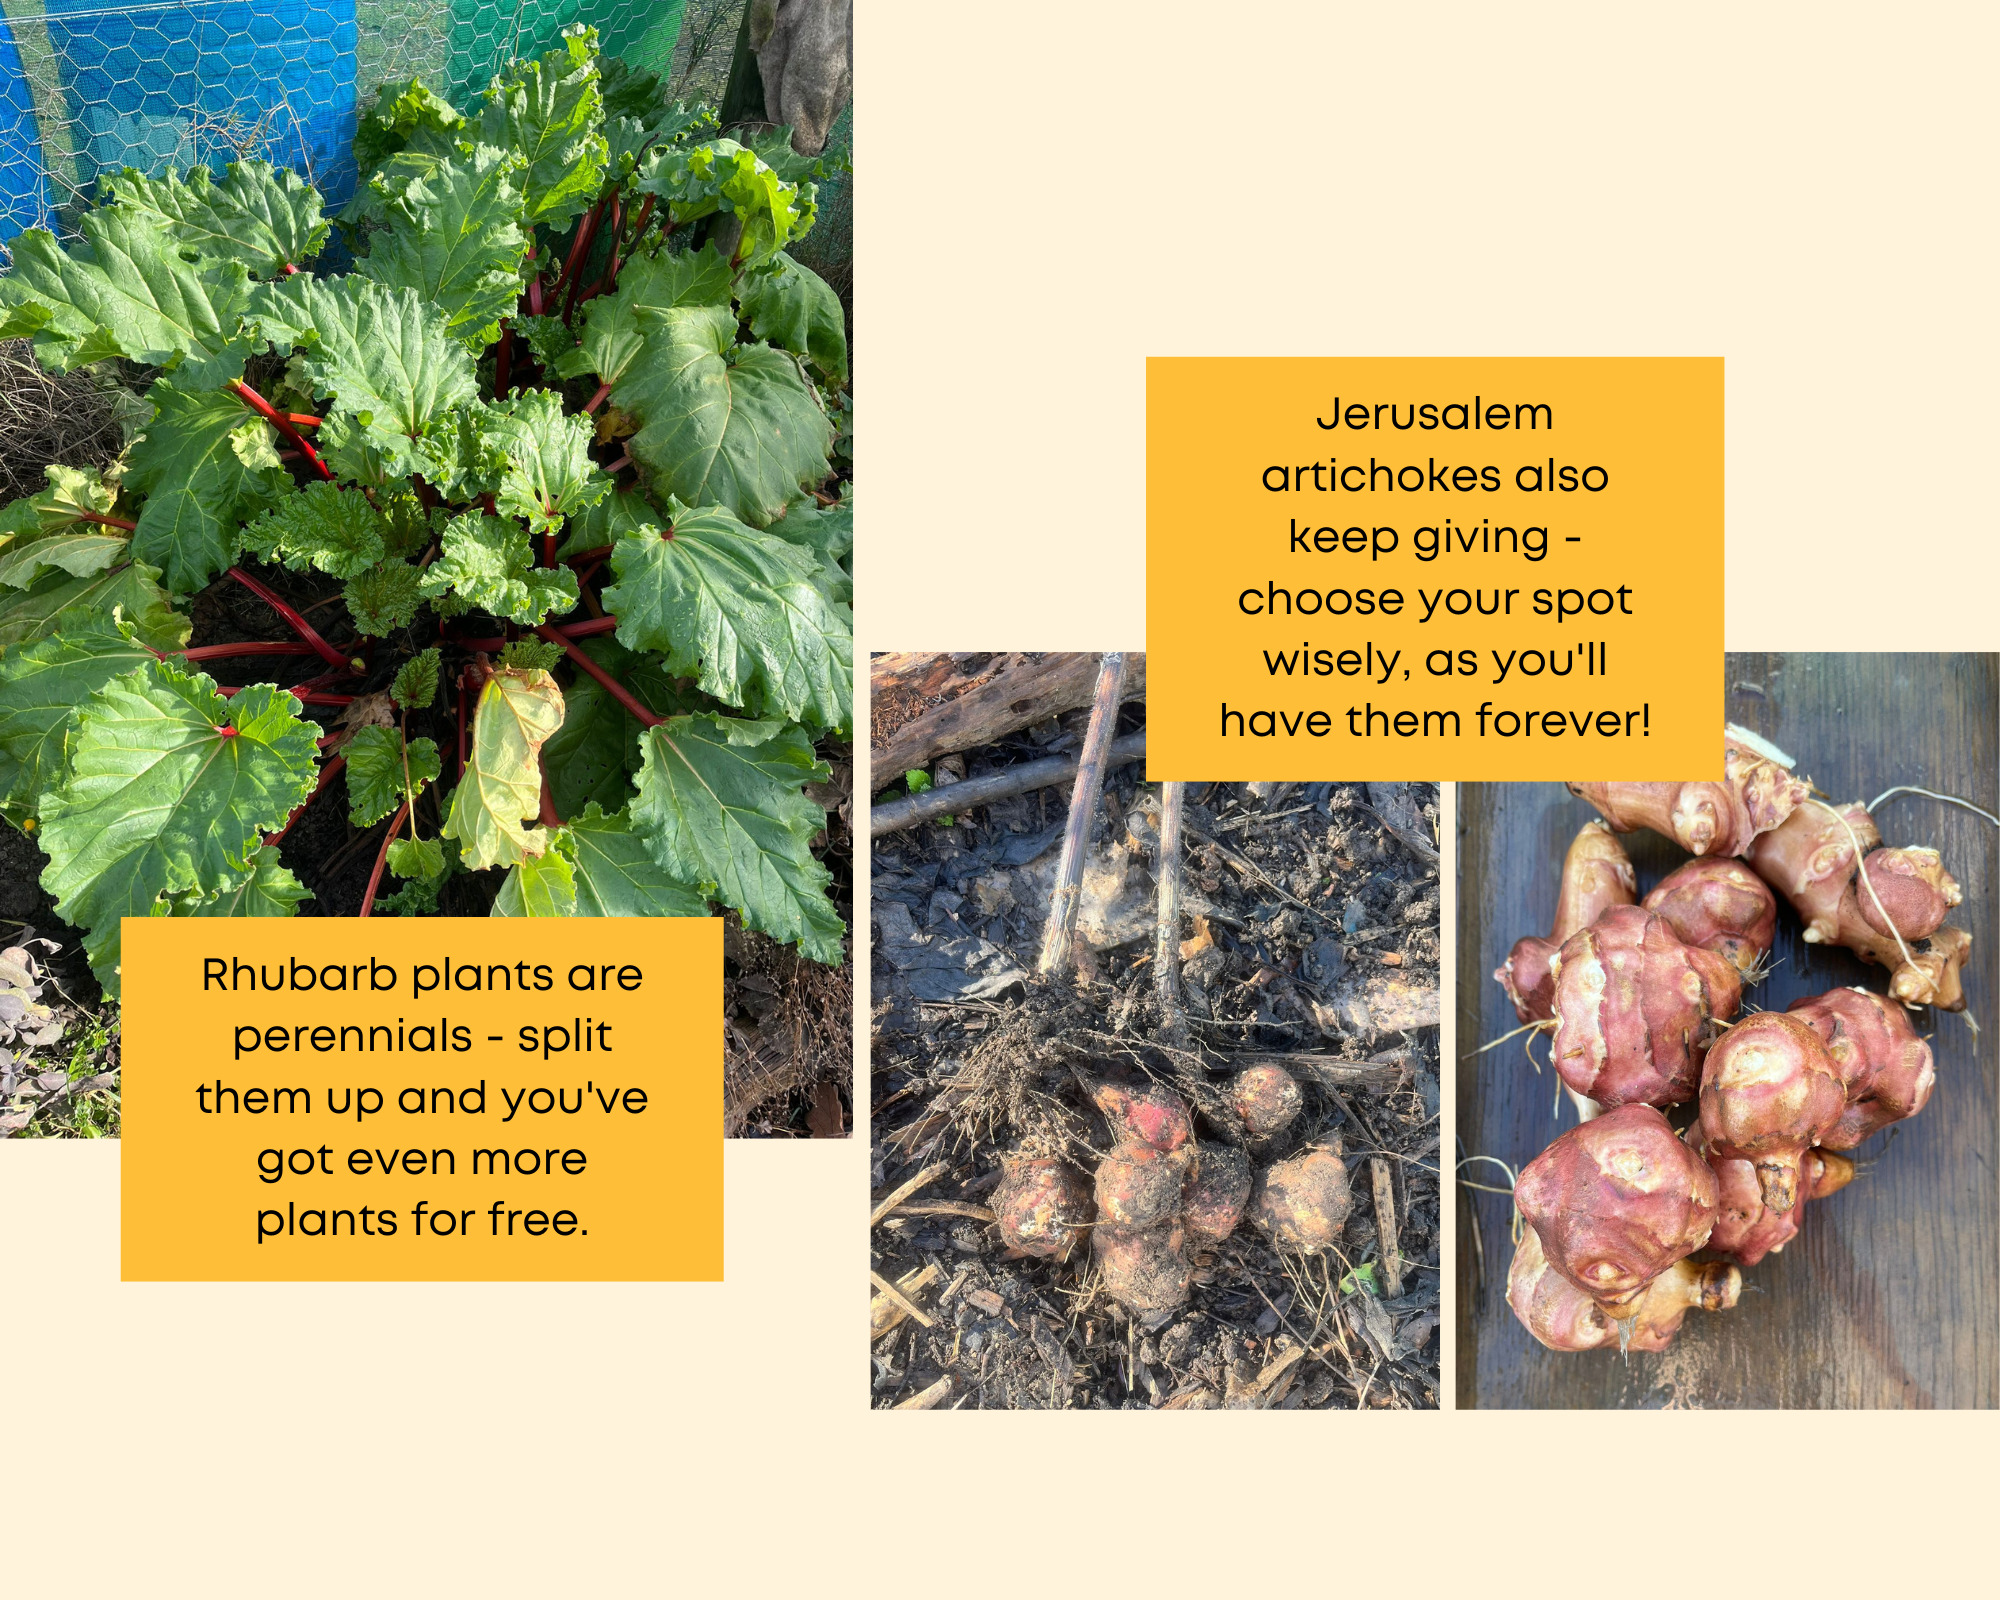
Winter is also a great time to split rhubarb, while the plant is dormant. Remove any old foliage and the largest stalks, then, using a spade, dig up the existing plant in a wide circle around the whole thing, leaving as big a root ball as possible.
Wash off the roots so you can see where they attach to the crown — this makes it easier to see what you're working with. Then split the plant into sections by cutting with a sharp spade (a knife or secateurs can help with smaller or more precise cuts), aiming to separate out individual crowns and clumps of root and growth. Any piece of root with a bit of green on top will regrow, so don't worry about being too tidy.
You can replant divided crowns straight back into the ground, or pot them up to plant out later. If planting directly, replant to the same level in the soil — the crown should sit just above the soil surface — adding extra compost and some mulch around the plant, and water well to settle in.
Give away any extra plants you may have. Burn unwanted roots, or leave them to completely dry out before composting. Once planted, let the new plants establish for a year before harvesting, so they can build a strong root system.
Jerusalem artichokes / Sunchokes
Contributed by Emberly Wetherall (Grow Wānaka)
Jerusalem artichokes, also known as sunchokes, are delicious tubers harvested throughout the winter months. This high-yielding plant in the sunflower family is ready to harvest once the stalks have died off.
Use a spade to dig up the tubers, leaving the smallest ones in the soil to regrow for next year's crop. If you want a bigger crop, you can save aside some of the bigger tubers for replanting too, but we find we get a very generous harvest each year by just leaving some of the smaller ones behind.
Pull the clumps of tubers off the dead stalk, wash, and they're ready for cooking, roasting or fermenting.
If you're establishing this crop for the first time, prep the soil with plenty of compost and lightly bury your tubers approximately 40cm apart, watering them in well.
Choose your spot carefully: any tuber left in the soil, even a small piece, will regrow, so sunchokes will happily come back and spread year after year if left unmanaged. Pick a place with a bit of space, away from other crops, where you're happy for them to establish permanently — and dig up as many tubers as you can each harvest to keep them in check. So many amazing ways to enjoy sunchokes!
Currants and Gooseberries (= Ribes): Pruning season doubles as a propagation opportunity
Contributed by Theo Richard (The Sherwood)
July is a good time to think about pruning your berry bushes while they go into hibernation mode. And good news — your offcuts can become brand new bushes! Perfect for filling up that extra space in your garden to increase your harvest, or for giving away to those friends who keep reminding you about that currant cordial you made, so they can grow their own bushes.
If you don't have any currant or gooseberry bushes yet, this is exactly what your neighbour with an established patch will likely be doing over the next month or two — and a great chance to ask if they'll save you a few cuttings rather than buying new plants.
I'll focus here on currants and gooseberries, as I have a number of them at Sherwood and in my own garden.
First thing is to wait for the coldest part of winter (mid-July to late August) to be sure your bushes are totally dormant — but not so late that they're already heading into budburst.
Black Currants/Red Currants:
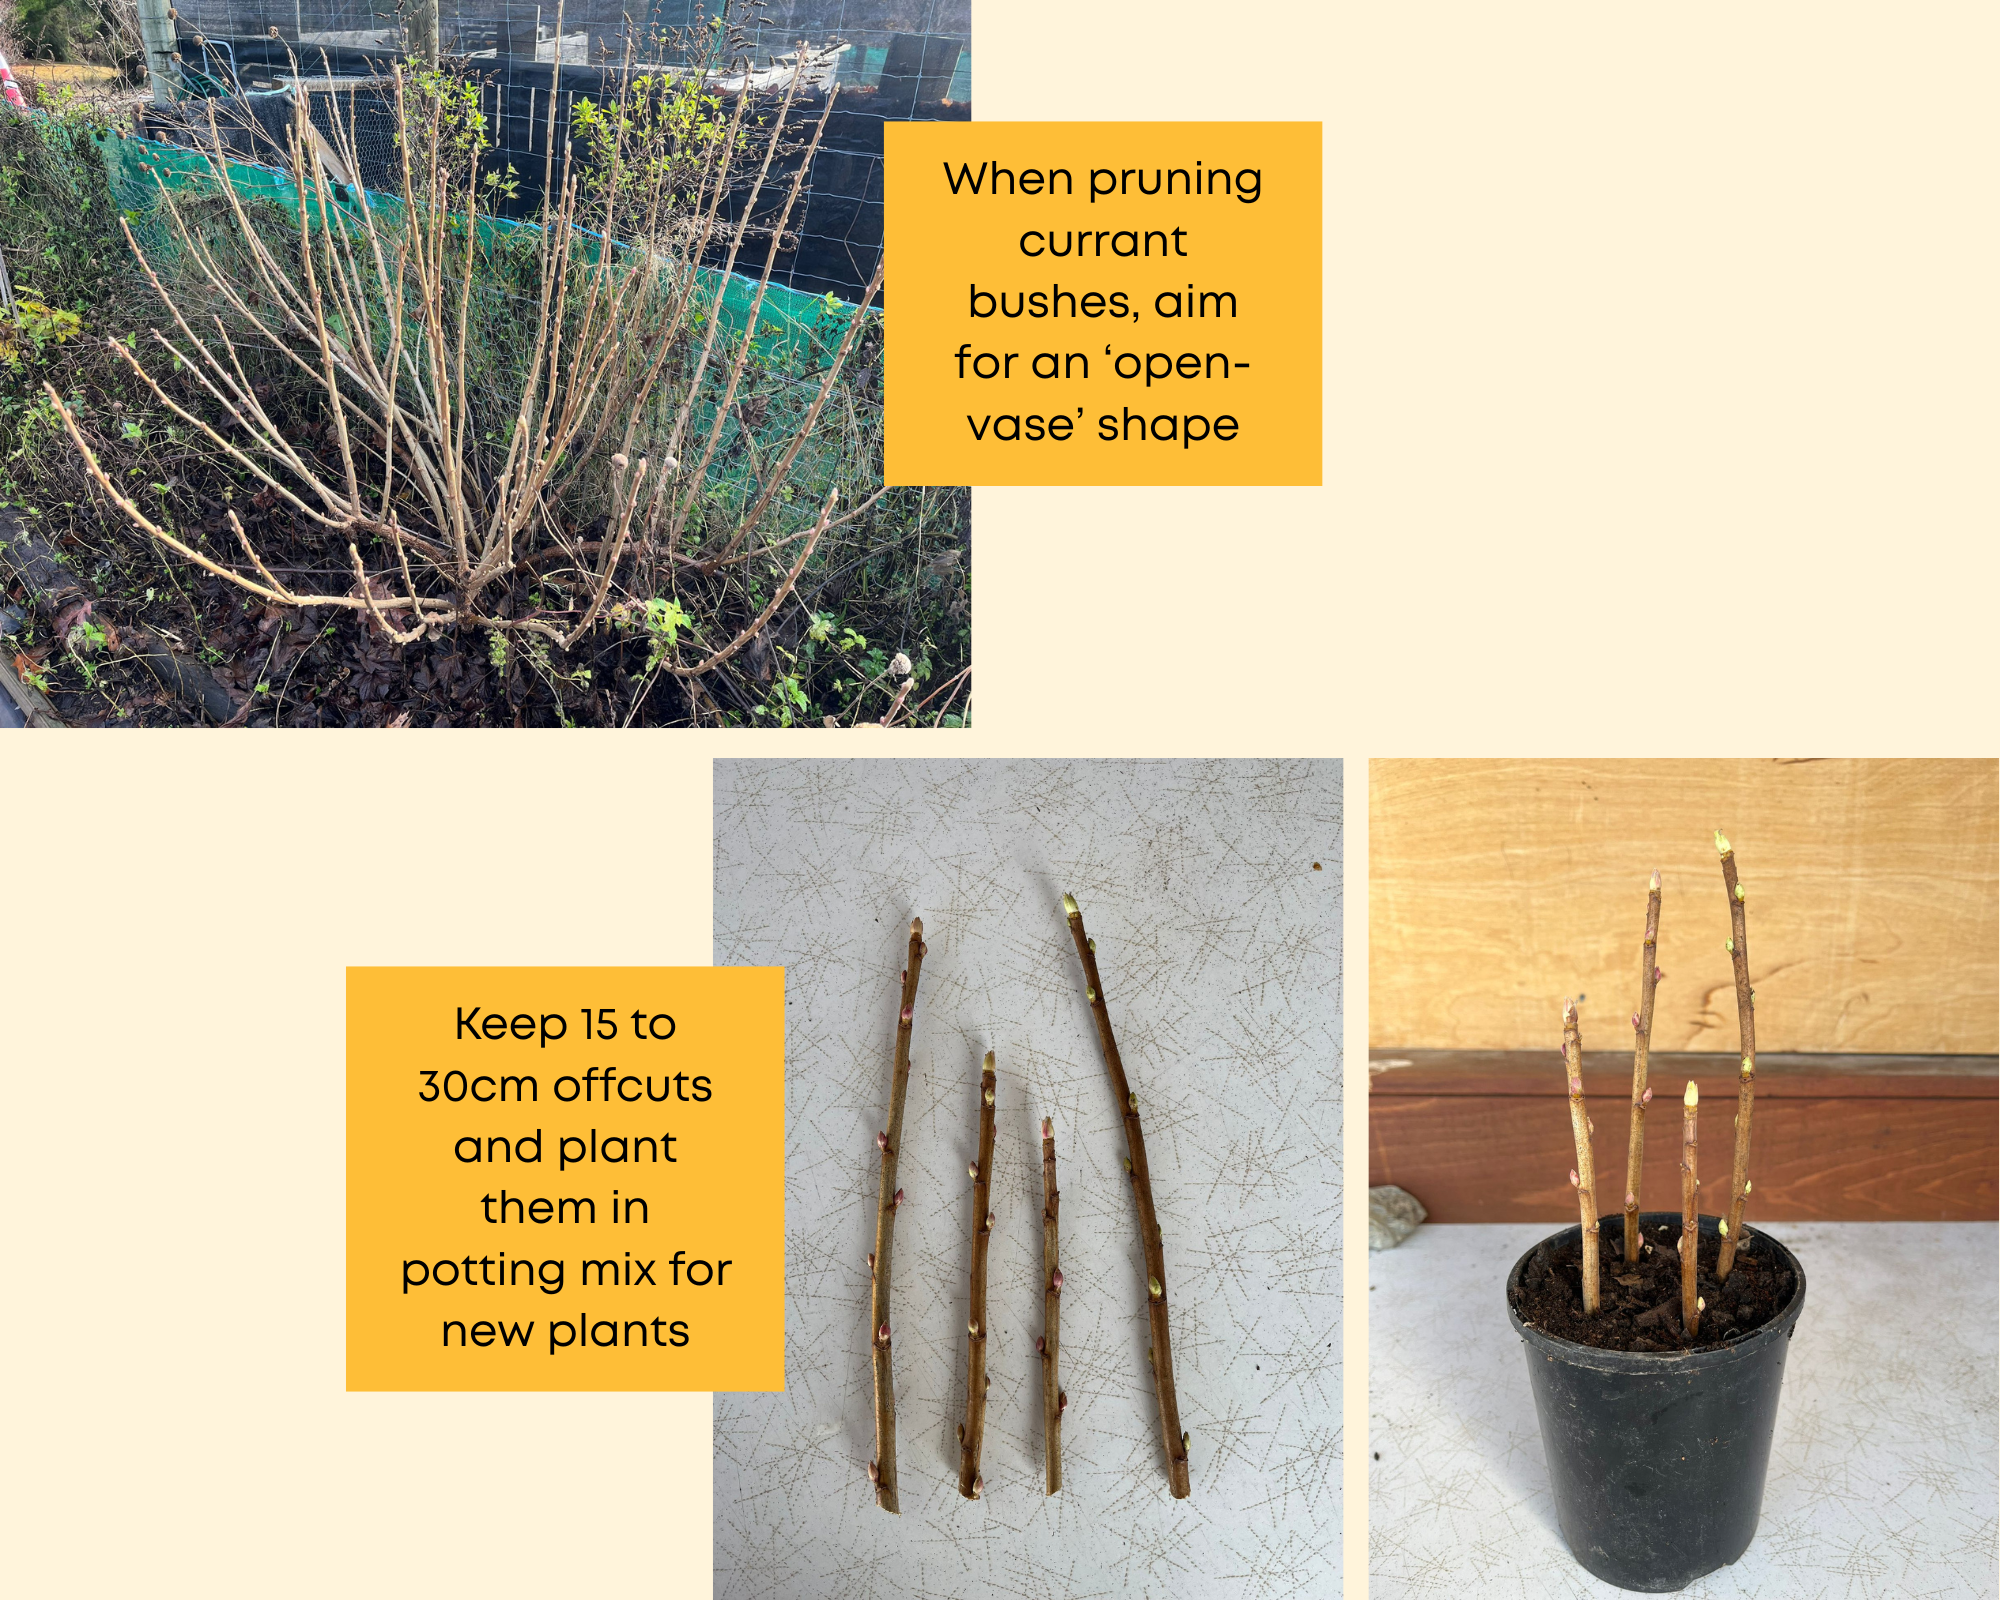
Now that all the leaves have fallen and you can admire your established currant bushes with all their new growth from the summer season, it's time to give them a little haircut. At this point, it's easy to distinguish the newborn light-brown shoots from the darker, older ones. Overall, you want to aim for a nice "open vase" shape, so I'd recommend starting by cutting the very low-hanging branches and any that cross sideways through the centre or between your nice upward-growing branches.
For black currants, berries grow best on new growth from the previous season, so you'll want to remove a few (just a couple!) of the old, weak, and "crowded" branches so your new, strong, young shoots from the base have room to grow up and give you a good harvest. Aim for a nice mix of young, less-young, and old branches by the end.
For red currants, berries grow best on young shoots borne on older branches, so you want to maintain that main old frame of 5–10 branches and encourage the new shoots growing on them from last season — while perhaps keeping a few new shoots coming from the ground to train as new main branches over the coming years.
Gooseberries:
Gooseberry bushes are pruned in much the same way as currant bushes. Clear those low-hanging branches running close to the ground. Remember that “open vase” shape — it improves airflow, and clearing out crowded sections will help with harvesting, so you can actually see those sharp thorns when picking your reward.
After pruning:
Once you're done, it's always a good idea to spread some compost around the root zone, topped up with mulch to retain moisture ahead of spring and budburst.
Propagate:
You should now be left with some offcuts from your pruning session, and the good news is they can become new bushes of their own — just follow these steps:
From your cuttings, select the young ones from the previous growing season — usually light brown, pencil-thick, about 15–30cm long.
Cut the bottom just below a bud and place the cutting in a pot with well-drained soil or organic potting mix, leaving a few buds above ground. Alternatively, plant the cuttings straight into the ground.
Don't forget to keep the soil moist. Your offcuts will establish roots and new growth over the coming season and will be ready to transplant next winter!
A few notes on where to plant Ribes:
Our cold winters and dry summers are actually ideal for Ribes — they need many hours of winter chill to fruit well, and our cool summers suit the ripening phase. The main risks are late spring frost and nor'west wind, not the cold itself.
Sun: Morning sun, afternoon shade is ideal — currants are one of the few fruiting plants that thrive in partial shade. The east side of a fence or building works well. Gooseberries want slightly more sun than currants.
Avoid: Frost pockets and exposed, windy spots — brittle stems snap when laden with fruit. A bit of slope helps cold air drain away.
Soil: Well-drained; Ribes tolerate most soil types. Central Otago's stony soils drain fine but lack organic matter, so dig in compost before planting and mulch afterwards.
Spacing for netting access (the key bit): Our birds love berries — if you don't net your bushes before they colour, you'll lose your whole crop! So allow enough space to net them fully.
Bush to bush: 1.2–1.5m
Bush to cage/net wall: 40–50cm clearance (foliage touching the net is how birds peck through)
Walking space around the whole netted area: 50–60cm, so you can check the net is pegged down everywhere
Netting practicalities:
Ideally, don't drape the net straight onto the bush — build a simple frame so it's held clear, with an access point for harvesting. If you're on a budget, though, it's fine to net the bush directly; the birds will just pick off the outer berries.
The net must reach the ground and be weighed down all round — gaps at the base are the #1 way birds get in.
For multiple bushes, one shared cage over the group beats netting each bush individually — far less leaky.
Redcurrants and whitecurrants ripen earliest and are especially attractive to birds — have the net ready before they colour up.
Tips!
If potting your cuttings, don't forget to label your pots — currants look very much alike!
Plant more cuttings than you need; success isn't guaranteed.
If you don't have currants or gooseberries but would like some cuttings, keep an eye on Sherwood socials — we might run a community berry pruning event in August!
If you're planting your cuttings straight into the soil, see the advice above on positioning your berry bushes.
Indoors
Microgreens
Mesclun salad mixes - Rocket, Mizuna, Mibuna are the quickest
Asian Greens - Pak Choi, Tatsoi
Herbs
Sprouting seeds
Microgreens & Sprouts
Microgreens and sprouts are especially good for beginners: fast, easy, reliable and nutritious.
For simple instructions, check our Month of May gardening blog or check out King’s Seeds guides.
Resources:
Harvest Homegrown holds a range of workshops in July
Harvest Homegrown has an awesome little guide on growing strawberries the lazy way
Harvest Homegrown holds a garlic and strawberry planting workshop yearly, check dates here.
Kings seeds migrogreens and sprouts guide.
If you’re unsure why to plant Jerusalem artichokes, check out this mouth-watering winter recipe from Dishes with Del: Jerusalem Artichokes!
-
Contributed by Erin Allison (Harvest Homegrown)
Growing from seed is the cheapest way to grow a bountiful garden, and gives you the most variety to choose from, enabling you to better customise your garden to our climate. Before you start, here are the most important things to know when choosing seeds. All this info can usually be found in seed catalogues or on the back of seed packets.
Days to Harvest (shown as days or weeks): how long your plant will take, from either seed or transplant, until it's ready to eat. There can be big variations, and with our shortish growing season, it's important to be aware of this. Most dwarf or shorter varieties will be quicker to harvest, but they'll often finish cropping sooner too — so mix and match, with some early varieties and some later ones.
Germination Temperature and Days to Germination: some seeds germinate at temperatures as low as 7°C, while others need 20°C or more — this tells you whether you need to start seeds indoors or can sow them directly in the soil. Some seeds pop through the soil in as little as 4 days, others take up to 3 weeks, so it's worth knowing how long to keep nurturing them before deciding to start again.
Pre-planting requirements: some seeds benefit from soaking prior to planting. This includes celery, parsley, peas and beetroot.
Cold Hardy varieties can withstand frost. They prefer cooler conditions — spring, autumn, or summer shade — and will handle a light frost, but not repeated frosts. Warmer-climate varieties can't handle any frost at all, and prefer warmer overnight temperatures too.
Treated Seeds are coated in a chemical that organic growers will want to avoid bringing into their gardens — watch out for this particularly with peas, beans, and spinach seeds.
F1 Seeds: this means you can't save seed from them to regrow true to type next season. But you could save viable cuttings for next season: for example with an F1 type tomato, you can break off a lateral and pot it up to root and save the plant for next season.
Height/space the plants will grow into: it's important to know whether you can grow them in containers, whether you'll need a trellis or stakes for support, or whether the plants will spread out over a large area that may not suit your space — or require structures built before you plant out. Vertical growing can give you a much bigger yield within a smaller footprint, but you'll need to plan and prepare for it in advance.
Light requirements & planting depth: some seeds require light to germinate, such as lettuce, while others prefer being planted deeper. A general rule is to plant to a depth that 2-3 times the width of the seed, but it pays to check per variety. Considering post-sprout light requirements is also important. If growing indoors, choose a space that maximises the duration of light, and consider purchasing grow lights to supplment for the short days. If your seedlings are leggy, for many plants, you can simply bury the stem deeper when repotting.
Want to learn everything you need to know to grow from seed successfully? Erin at Harvest Homegrown is running a variety of workshops during July and August to teach you everything you need to grow well in this climate. Find out more here.
If you haven't yet collected or ordered your seeds for spring planting, check out our May blog post and order now.
Also worth a look: the Koanga Institute's booklet Save Your Own Seeds.
-
Low cost gardening tips
Swap seeds
Collect compost materials
Share tools
Join community gardens
Join gardening clubs
Reuse materials creatively (keep in mind that you want non-toxic materials near the food you grow!): For example, look for pallets stamped HT (heat-treated) rather than MB (methyl bromide fumigated) - HT pallets are great for building raised garden beds. Many wineries and orchards regularly get rid of their old fruit nets - get in touch with them to see if they could give you some bits to re-use. Wastebusters has a 'garden' section where you can find treasures to reuse, plus secondhand pots, trays and tools worth a look.
Keep an eye on Facebook marketplace for deals or giveaways - cloche hoops, 100% wool carpet with a natural backing to suppress grass, seedling propagation equipment, irrigation material etc.
Use flattened cardboard as a free weed-suppressing layer under new garden beds
Use winter well
This was true last month, and it still is in June. Use winter to:
Identify sunny areas in your garden
Note frost zones in your garden
Plan bed locations (if you are postponing the bed building, or plan to create more later in the year)
Think about what your household actually eats
Source seeds early
Read up on gardening (see our book tips below)
-
This month, our plant to forage is contributed by Loran Verpillot, medical herbalist at Herbal Culture.
Forage now:
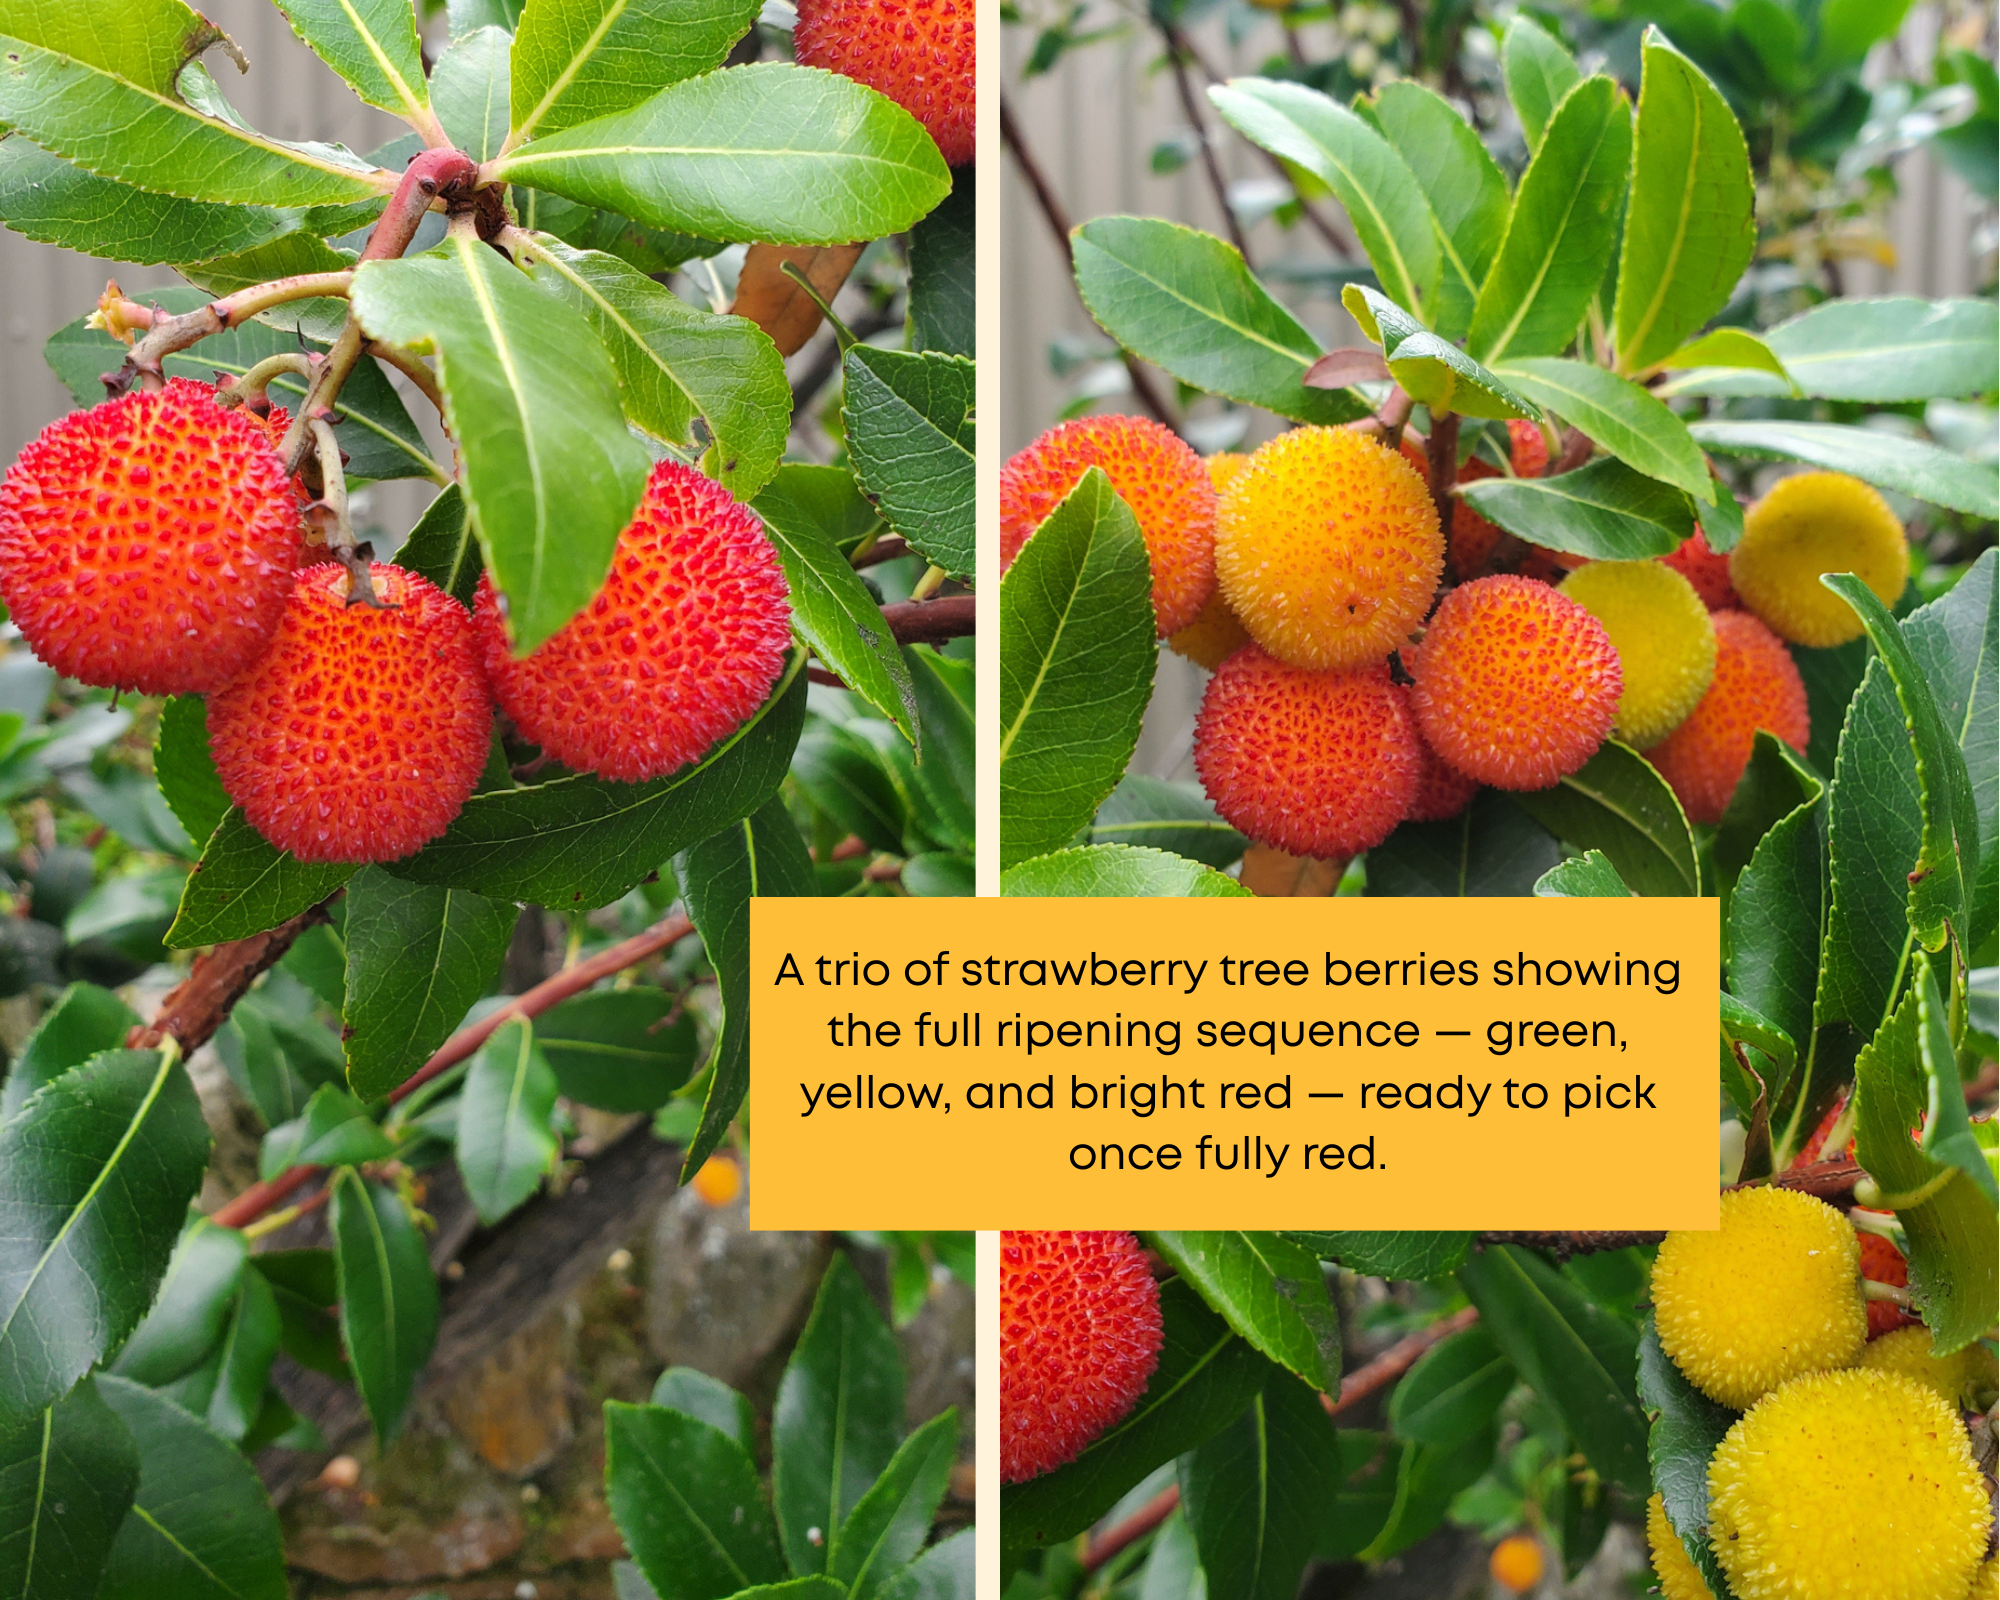
At this time of year, you can still find a few plants to forage and complement your diet, this month we will focus on the Strawberry Tree.
The strawberry tree is native to the Mediterranean region but can be found throughout much of Europe. It has also been introduced to many other parts of the world, including Aotearoa New Zealand.
It is commonly planted as an ornamental tree in gardens and parks, where it can reach 7–10 metres in height. Exceptionally hardy, It tolerates drought well, and once established copes with frost, though young trees benefit from shelter in hard winters.
Since strawberry trees here are garden or park plantings rather than wild bush plants, always ask before picking from a private garden.
The strawberry tree produces unusual, attractive fruit that is edible once fully ripe. As the berries mature, they change colour from pale green to yellow and finally to a vibrant bright red. A single tree often carries fruit at different stages of ripeness alongside its flowers. The berries ripen from autumn through winter, making this an excellent berry to forage now.
Pick only the bright red, ripe fruit, and be sure to leave some for the birds and other critters.
The fruit has a rough, slightly spiky skin which softens when ripe. The flesh is yellow-orange filled with some tiny seeds.
Strawberry tree berries are a good source of vitamins, particularly vitamin C. They can be enjoyed fresh, although they are more commonly made into jams, jellies, syrups, or liqueurs, and can also be added to cakes, muffins, and other baking.
—
Food resilience is not only about what you grow or store. It is also about noticing what food already exists around you. Local foraging knowledge helps households identify seasonal wild foods, fruit trees, herbs, nuts, mushrooms and edible weeds in our landscape. Building this knowledge increases confidence, reduces waste, saves money and reconnects people with place.
Even learning a few safe, abundant species each season can meaningfully strengthen household food resilience.
Start small and safe:
Learn correct identification
Avoid sprayed or polluted areas
Take only what you need
Leave plenty for others and nature
Never eat wild plants or mushrooms unless identification is certain.
Resources:
If you are new to foraging, it is important to learn identification from trusted sources and local guides before eating any wild plant.
iNaturalist NZ (best overall for accuracy + community verification)
https://inaturalist.nz - Global platform with a strong NZ community of botanists and ecologists. You upload photos and get community-verified identifications.
Seek by iNaturalist (best beginner app)
https://www.inaturalist.org/pages/seek_app - Simple, camera-based ID app that works offline and is designed for quick identification in the field.
Book: Foraging New Zealand by Peter Langland
Central Otago Foraging Facebook page
Foraging walks are offered on a regular basis by some of our talented local herbalists such as:
Loran Verpillot from Herbal Culture (Upper Clutha)
Rochana Moon from Wise Moon Wellness (Upper Clutha)
-
Food resilience is not only gardening, it includes your household pantry.
In our previous editions, we recommended you start building staples for a few weeks — we suggest you keep adding to it until you have about 2-3 weeks worth of food for your household, including rice, pasta, salt, tinned beans and tinned tomatoes. This helps when fresh food is scarce, prices rise or shops are inconvenient.
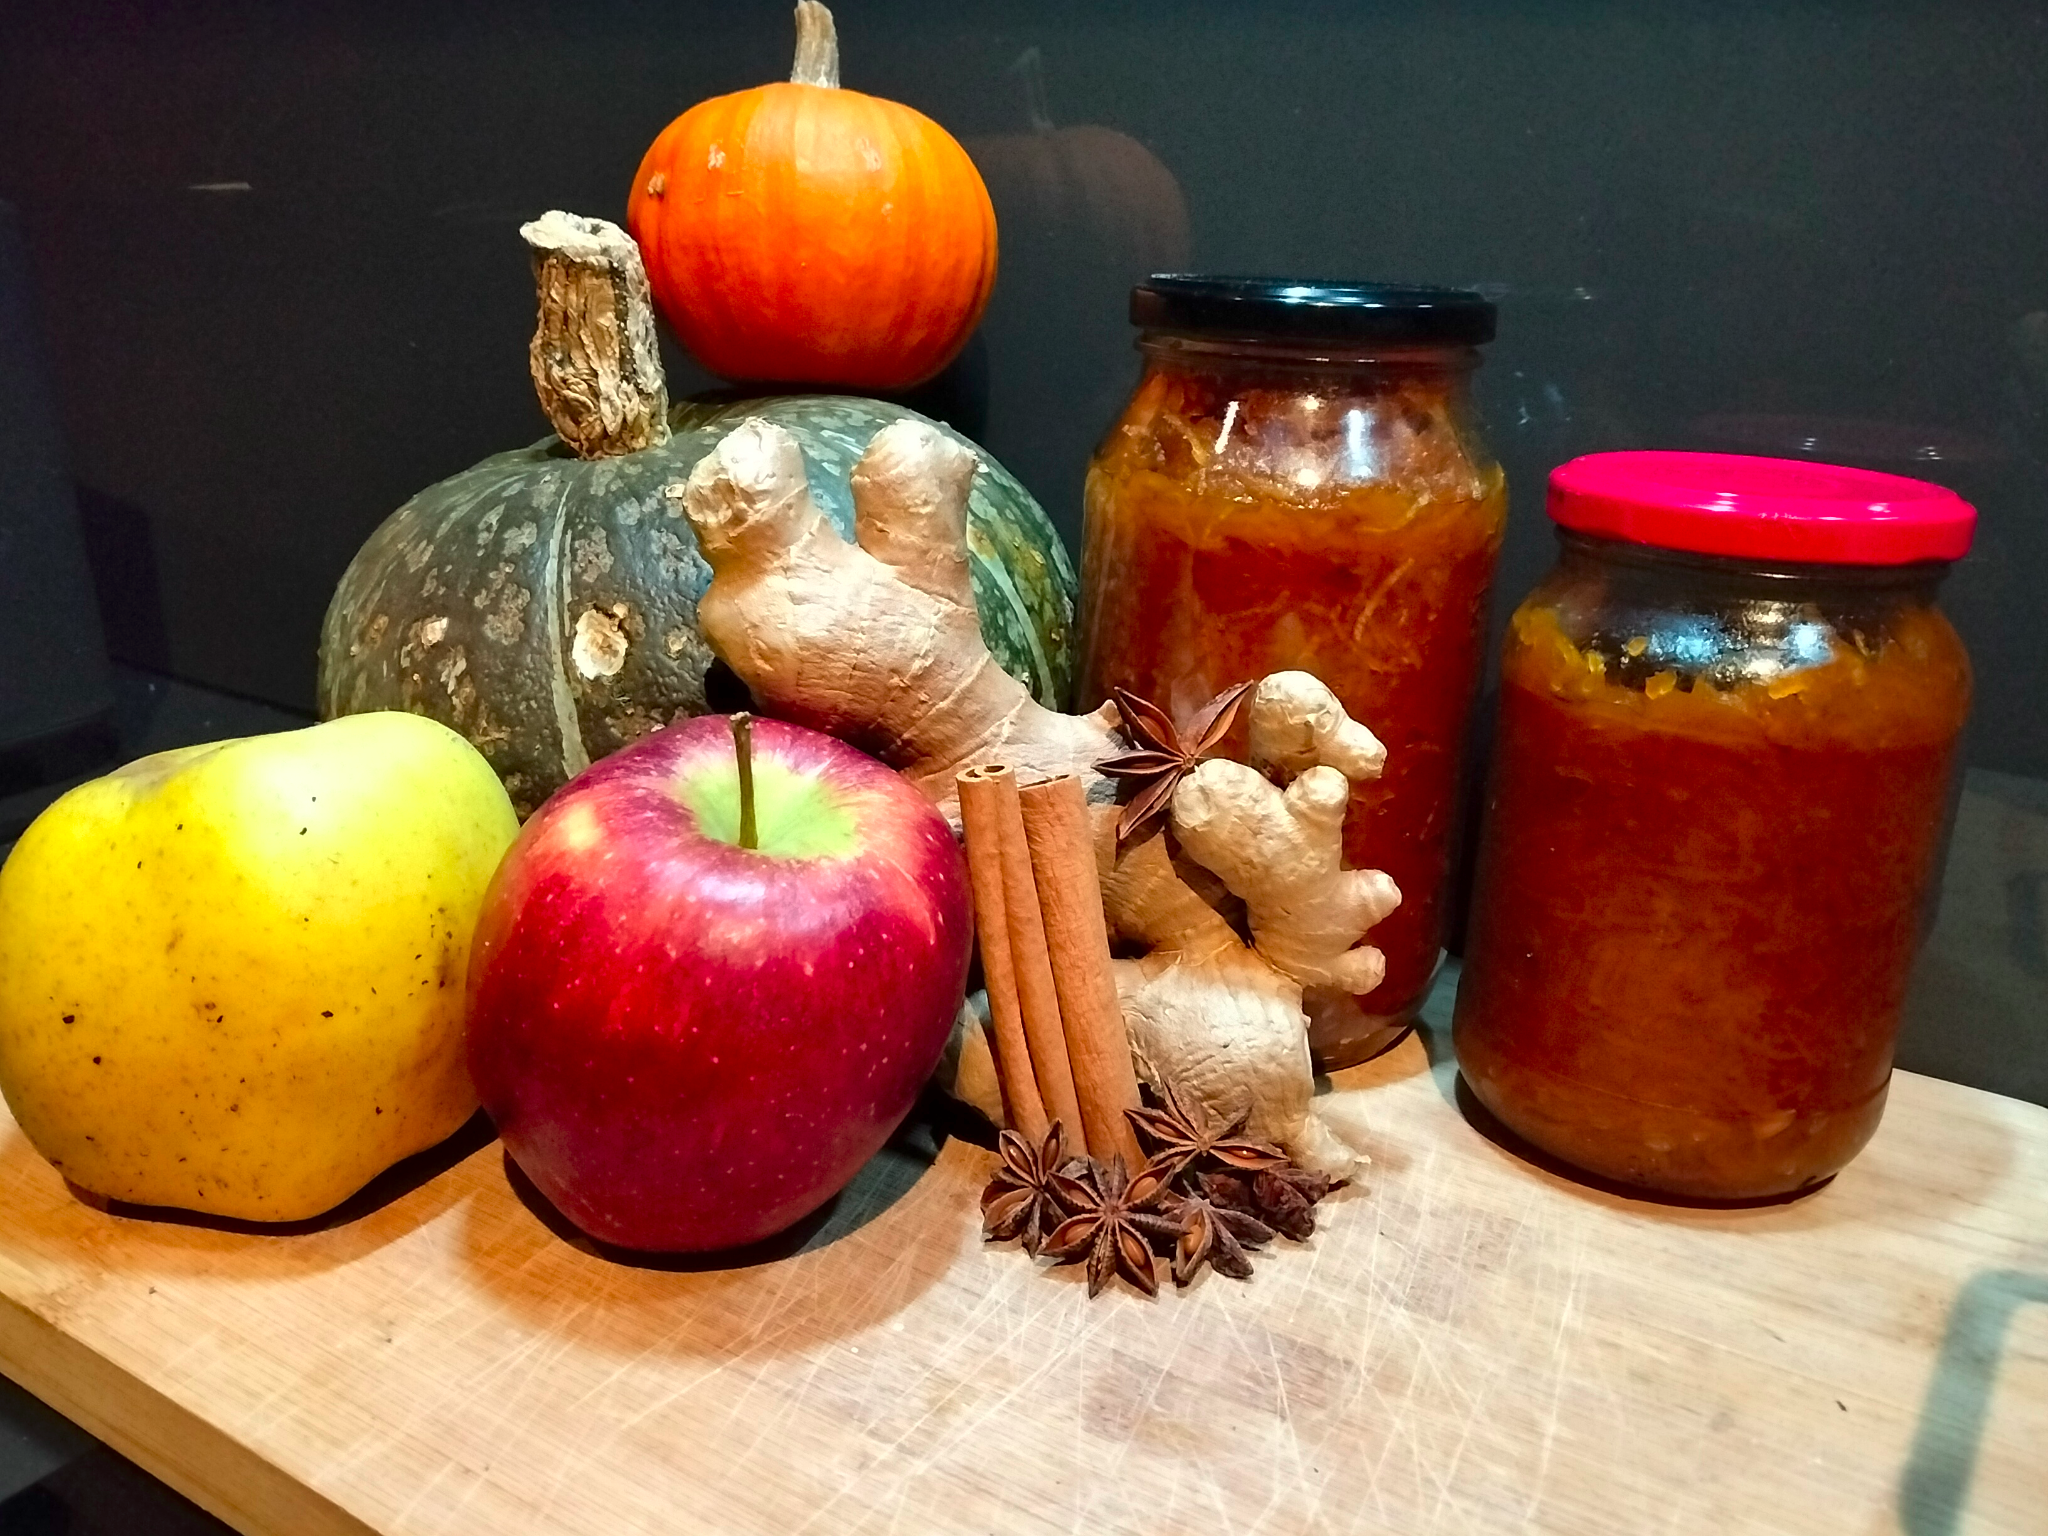
Theo Richard, head gardener at The Sherwood, is still processing some of the autumn bounty and kindly shares his pumpkin and apple jam recipe:
Spiced pumpkin and apple jam
Winter is here! And while you may have already run out of your summer apricot jam (mine goes down way too fast), it's not time yet to put your jam pot away for hibernation. There are still some sweet preserves to be made, and this one has been one of my go-tos for several winters now, thanks to my older sister, who taught me this recipe some years ago. It gives me an extra option for what to do with the pumpkins from my garden come winter, while restocking my shelves of sweet preserves at the same time. And it's a good reason to use up those leftover spices from the last batch of mulled wine you made for friends at your winter party. Perfect on morning toast, with a cheese platter, with some yoghurt, etc… Jam's my jam! And like Bob Marley said: "We jamming, and I hope this jam is gonna last!" Let's get to it!
Ingredients:
1kg pumpkin flesh (our good-ol' crown pumpkin will do, but other varieties work too)
2-3 apples, nice and firm — lots of local organic options at your local stores
500g sugar (up to your taste, but keep in mind sugar helps your jam set*)
1-2 lemons (to juice). Lemon juice, by lowering the pH, helps with preserving, limits oxidation and also activates the pectin, the natural setting agent found in fruits, a true friend !
A few grams of agar-agar powder** (a natural setting agent and a good way to reduce sugar content — alternatively, you can use more sugar, a total of 750g should do).
2-3 cinnamon sticks
1 tsp ground cinnamon
A few (5-6) slices of fresh ginger (or to your taste)
A few (3-4) star anise seeds (or to your taste)
*A note on sugar: reducing the sugar below what's listed will affect more than sweetness — sugar is what helps preserve the jam, so less sugar generally means a shorter shelf life (think weeks/months in the fridge rather than a year in the pantry). If you do cut back, treat the jam as a fridge preserve rather than a pantry one.
**A note on agar-agar powder: you can find it at McKibbon’s or Soul Food Organic Store in Queenstown, for example the Pacific Harvest and Equagold brands. Usually a few grams of powder per kilogram of fruit are recommended, with a little extra if you prefer a firmer set jam. Alternatively, you can also use gelatine.
Recipe:
Peel the pumpkin and apples, then grate them coarsely using a food processor — or your own muscles, if you're up for a workout! I start with the pumpkin first, as apples can oxidise quickly and turn brown. Alternatively, you can mix the grated apple with lemon juice straight away to prevent this. Set the apple cores aside — you'll use them later: apples contain pectin, a natural thickening agent!
In a large cooking pot, combine the grated pumpkin and apples, apple cores, sugar, lemon juice and spices. I'd recommend putting your "hard" spices (cinnamon sticks, star anise) and apple cores together in a little ‘tea bag’ or muslin cloth, tied up— it makes them much easier to remove before jarring the jam. (If you don't have one, that's fine too.) Mix together and leave to rest overnight. (A few hours will do if you're short on time, but I like an overnight rest, as it lets the flavours develop better.)
The next morning, you should have a lovely, flavourful mixture, ready to cook! Start cooking the jam, and once it's hot, mix in your agar-agar at the recommended ratio and stir well. Cook the jam until it's ready (nicely thickened, with a gentle bubble) — this can take some time. Once ready, remove the spices and apple cores from the jam. Alternatively, I leave them in and remove them later while spreading on my toast.
Pot into sterilised jars while hot, seal them, flip upside-down, and leave to cool on the bench.
Alternative options:
Cardamom and cloves also work really nicely in this recipe
If you have a spare, lonesome orange left in your fruit basket, you could add its juice too
If you don't have a grater, you can cut the pumpkin and apples into small cubes and, once cooked, roughly mash the mixture. Just don't forget to remove the spices and apple cores first!
Don't hesitate to give me a shout on how you went, or if you need any help, or come and see me at The Sherwood garden!
If you have questions or comments for Theo, please use our feedback form at the bottom of this blog, thank you!
Look out for:
Food preservation workshops
Cooking skills events
Waste reduction programmes
Wao Food Resilience calendar of events is a good place to start
Resources:
Dishes with Del (pantry and waste reduction tips)
Dishes with Del winter recipe: Jerusalem Artichokes!
-
We will focus on:
Seed raising - continued
Seed potatoes
Rabbit resistant planting
Irrigation
Make a delicious pumpkin apple jam using Theo’s recipe.
-
Ali Soper: seasonal gardening advice via Your Garden Coach podcast and consultations
Erin Allison Harvest Homegrown: market garden, gardening guides and home veggie garden courses/workshops (Hawea Flat, Wanaka) (on Facebook)
Dr Compost: composting made easy as well as gardening education: online info and in-person workshops available in Upper Clutha and Whakatipu.
Community gardens: Grow Wanaka, Hawea Food Forest, The Templeton Park Community Orchard (Albert Town Wānaka), and Queenstown Community Garden working bees.
Local Gardening clubs:
The Wanaka Vegetable Growers Club meets the first Wednesday of the month (apart from June and July) at St John's Rooms Linkway Wanaka at 7pm.
Food growing related speakers, Garden Visits, Discussions/Q & As sharing of knowledge of food growers in our unique environment.
Surplus seeds and seedlings.
Annual membership sub of $25. Garden Visits are free. Anyone is welcome to come to meetings as a visitor and check out if they want to join them.
Contact: wanakavgc@gmail.com
The Hāwea Garden Group is an informal gathering for people interested in all aspects of gardening.
Activities include garden visits, guest speakers, and hands-on workshops.
Free to join, and you’re welcome to attend whenever it suits.
Meets every second Thursday from 20 August (starting with a seed swap and seed raising session) through to 19 November.
For more information, contact Diana at mansondiana@gmail.com
Foraging walks are offered on a regular basis by some of our talented local herbalists such as:
Loran Verpillot from Herbal Culture (Upper Clutha)
Rochana Moon from Wise Moon Wellness (Upper Clutha)
-
Home / small scale regenerative growing:
The Edible Backyard by Kath Irvine (NZ). Excellent for practical, year round home food production in New Zealand conditions, with a strong focus on seasonal growing, resilience, and low input systems. She takes a very holistic approach and the advice is applicable to a wide range of zones. It is focused on getting the foundations right, with simple explanations and practical, reader friendly guidance.
Square Food Gardening 4th Edition. This is a book that often resonates with new gardeners with small spaces to grow food. There is a metric version too (One Square Meter garden)
The Abundant Garden by Nova and Yotam Kay (NZ). Excellent for productive household food systems, abundance, seasonality, and low input methods.
NZ Gardener Magazine is a great resource too.
Our libraries have plenty of books and magazines about gardening!
Seed sovereignty / resilience:
Koanga Institute resources and publications (NZ): Save Your Own Seeds
Foraging:
Foraging New Zealand by Peter Langland

The Southern Lakes Kai Collective at its inception in September 2024. It has since grown to 45 members from across the district and the wider food ecosystem.
-
The Southern Lakes Kai Collective is a think tank focused on increasing the district’s food resilience. The food growers generously contributing their time and knowledge to this gardening blog are:
Adele (Del) Holland - Dishes with Del : recipes, food preserving, avoiding food waste
Ali Soper - Your Garden Coach : podcast & food garden consultations
Ben Elms - Dr.Compost (Wastebusters): compost systems, soil health, gardening workshops, etc.
Brendan Lopez - Welcome Rock Gardens (bio intensive market garden)
Bruce Thurlow - Otago Polytechnic
Diana Manson - Hawea Food Forest : Community Garden
Emberly Wetherall - Grow Wānaka : Community Garden
Erin Allison -harvesthomegrown.co.nz : Homegrown organic produce and seasonal Veggie Growing Workshops for home gardeners.
Louise Wilson - Forager & home gardener
Loran Verpillot - Herbal Culture: Medical Herbalist, forager & home gardener / orchardist
Michael Sly - Waste to Wilderness: composting and microbial soil systems
Mickey Dahlstrom - Millbrook resort food garden
Neal McAloon - Queenstown Harvest Community Garden and Bee The Change
Sydney Telfer - Aspiring market gardener / regenerative agriculture
Theo Richard - The Sherwood restaurant food gardens
-
We welcome your feedback and invite you to use this form to share your thoughts, ideas, and suggestions
More about the Southern Lakes Kai Collective mahi here.