
Welcome!
Growing food in the Southern Lakes is a shared effort. Sixteen local growers, foragers and food-lovers from the SLKC are pooling what actually works in our climate, so beginners can start with confidence.
Whether you are renting, working with pots or planter boxes, or growing on a small patch of land, now is the time to begin.
This monthly blog brings together practical, seasonal knowledge from across the region to help households grow food, forage, and build up their pantry for the year ahead. Each edition is written with the beginner in mind, with guidance that’s clear, practical and easy to put into action.
This November edition covers choosing the right tomatoes and growing zucchini, supporting your summer crops with stakes and trellises, watering and mulching wisely ahead of a dry El Niño summer, companion planting basics, harvesting and drying your aromatic herbs, foraging elderflowers, and how to preserve broad beans and rhubarb.
Brought to you by the Southern Lakes Kai Collective
〰️
Brought to you by the Southern Lakes Kai Collective 〰️
Read the full blog below by clicking the + under each section, or download this November edition as a free PDF guide to read in your own time.
Your November challenge!
Choose one… or more!
Get a few tomato seedlings to plant out mid-month
Plant a zucchini (courgette) seedling out mid-month
Install supports now for your climbing crops
Learn to water and mulch like a pro
Try a companion planting pairing
Weed, feed and water your garlic
Harvest and dry your kitchen herbs
Harvest & process broad beans
Harvest & freeze rhubarb… or bake a cake!
Attend a gardening workshop (see our event calendar on this page)
-
Contributed by Ali Soper of Your Garden Coach.
Choosing the Right Tomato for Your Garden
A tomato picked ripe and warm from the garden tastes very different from one bought from the supermarket, and that is probably reason enough to give them some space in the summer vegetable garden. But choosing which tomatoes to grow can be confusing.
Open a seed catalogue and you'll find cherry, grape, cocktail, beefsteak, salad, Roma, and paste tomatoes. There are heirlooms and hybrids, and fruit that can be red, yellow, orange, green, striped and almost purple. Then you'll come across two descriptions that are particularly useful to understand: determinate and indeterminate. These aren't descriptions of the fruit. They tell us how the plant grows, how much space it is likely to need and, importantly, how it will produce its crop. Once you understand the difference, choosing tomatoes to suit your garden becomes much easier.
Where did tomatoes come from?
The tomato, Solanum lycopersicum, has a long history.
Its wild relatives come from western South America, particularly the Andean region. The history of its domestication is quite complex, and researchers are still refining exactly how the modern tomato developed, but Mexico and Mesoamerica played an important part in turning those small-fruited plants into the cultivated tomatoes we recognise today. The word tomato itself comes from the Nahuatl tomatl.
Spanish travellers carried tomatoes to Europe during the 16th century. They were initially treated with some suspicion in parts of Europe and were sometimes grown as ornamental plants rather than food. Italy and Spain were among the earlier European countries to embrace them as something to eat.
From there, tomatoes found their way into food cultures around the world.
In Mexico, tomatoes remain fundamental to salsas, soups, stews and sauces, often combined with chillies, onions and herbs.In Italy they became the basis of passata, pasta sauces, pizza toppings and slow-cooked dishes, as well as being eaten simply with olive oil and salt. Across the Mediterranean you'll find them cooked with eggplant, courgettes, peppers, beans and olive oil, or served fresh in salads. In India, tomatoes are now widely used to bring acidity and body to curries, dals and chutneys.
And here in New Zealand, we might be just as likely to slice them into a summer sandwich, add cherry tomatoes to a salad, make tomato relish or chutney, or turn a glut into sauce for the freezer.
Determinate tomatoes
A determinate tomato grows to a genetically determined size and produces much of its fruit over a relatively concentrated period. These bush-style plants are relatively contained.
They tend to be shorter and bushier and generally require less training than an indeterminate tomato. They may still need support - a plant heavily laden with tomatoes can become surprisingly weighty - but you won't usually be trying to persuade it down from the roof of your tunnel house.
Determinate tomatoes can be particularly useful if you have limited space or want a good quantity of fruit ready at roughly the same time. And being determinate, they grow well outside, in our short growing season here in Central Otago.
Determinate varieties are perfect if I'm making sauce or passata, I need enough ripe fruit to justify getting the large saucepan out.
Roma and other paste tomatoes are often chosen for this purpose. They generally have plenty of flesh and comparatively less watery seed pulp, which means less cooking is required to reduce them into a thick sauce.
You'll find determinate varieties available in New Zealand including Roma, Sicilian Sauce, and compact varieties such as Gold Nugget.
Indeterminate tomatoes
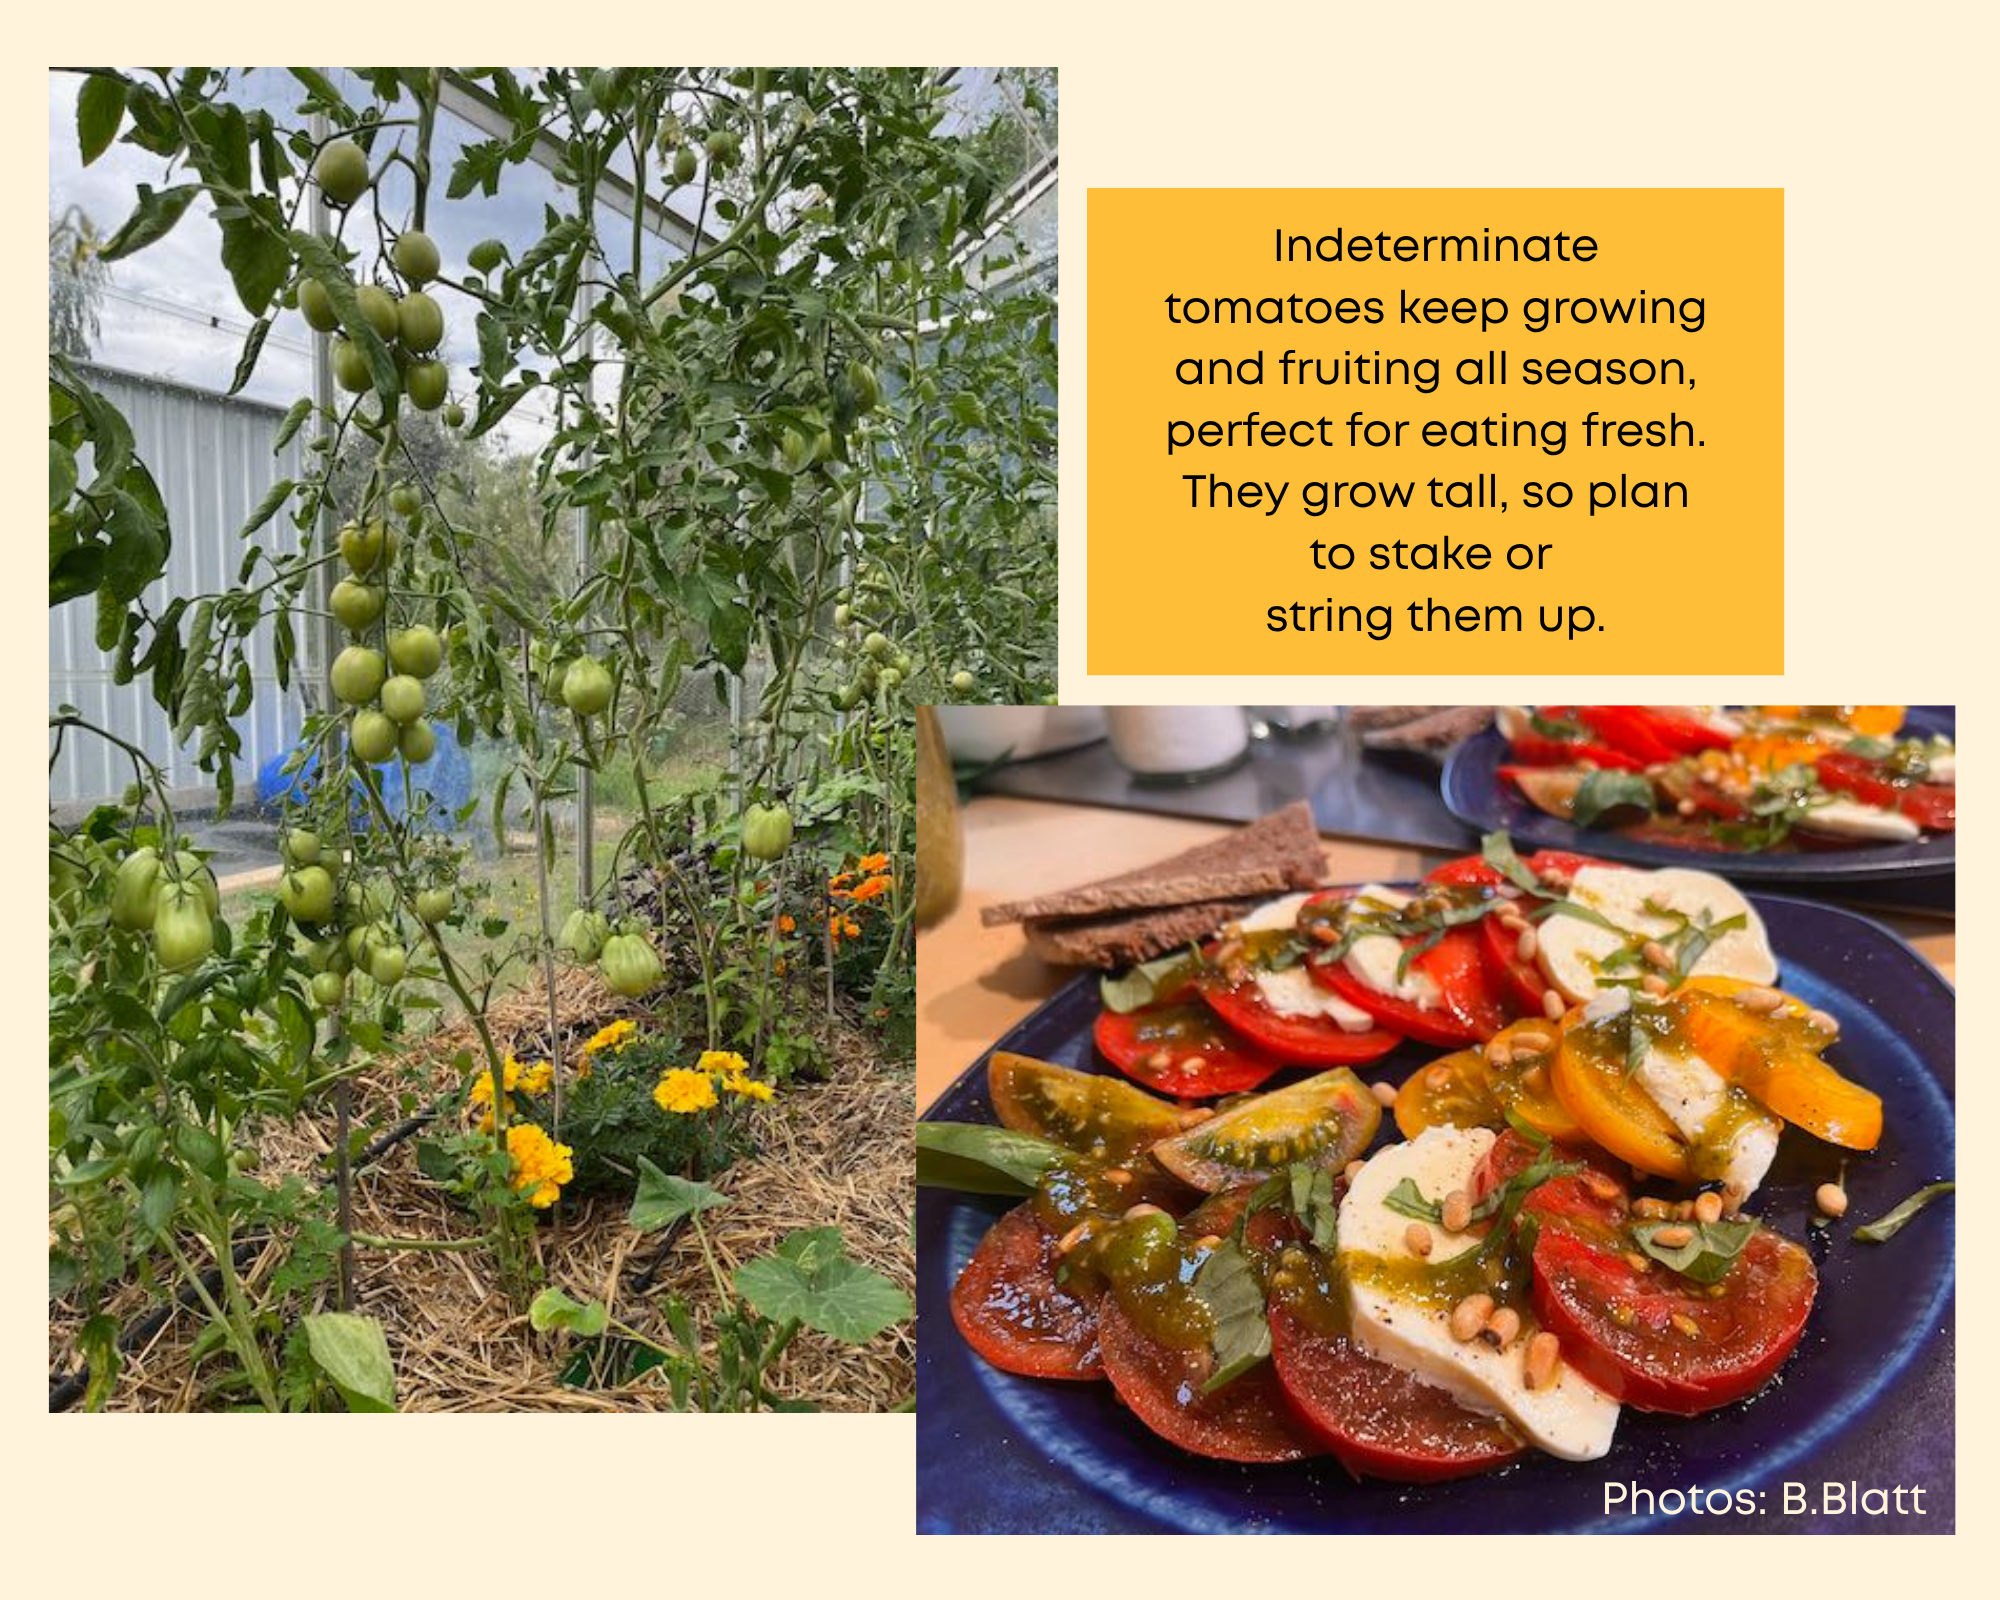
An indeterminate tomato keeps growing, flowering and setting fruit while conditions remain favourable. These are the plants that can become enormous. If you have ever grown a tomato in a tunnel house and found it reaching the roof before heading sideways, you've probably grown an indeterminate variety. Rather than giving you one concentrated crop, they tend to produce tomatoes progressively through the season. That makes them particularly useful for fresh eating.
There are many familiar indeterminate varieties available to New Zealand gardeners, including Moneymaker, Cherokee Purple, Tommy Toe, and Sweet 100s and one of my favourites – Green Zebra. The fruit can be completely different from one variety to another. Sweet 100s give us small, sweet cherry tomatoes. Brandywine Pink produces large beefsteak-style fruit. Indigo Pear Drops produce small, yellow, pear shaped tomatoes with purple shoulders! Tommy Toe is another cherry type and a useful choice for picking regularly through summer.
Indeterminate plants need a little more management. Give them strong support from the beginning rather than trying to add stakes once the plant is already falling over.
How many tomato plants do I need?
This depends very much on how you eat tomatoes. For a household of four I might grow:
2–3 cherry tomatoes for picking and salads
3–4 good slicing tomatoes
8–12 Roma or paste tomatoes for sauce and preserving.
Experiment this year and adjust the numbers next year.
And if you’re limited on space, keep it simple. Grow one cherry tomato, perhaps ‘Sweet 100’, and one good slicing variety such as ‘Moneymaker’. I’d save the determinate ‘Roma’ types for when you have a little more room. If you’re growing tomatoes specifically for making sauce, you really need a reasonable number of plants, around 8–12, to give you enough fruit at one time to make it worthwhile.
A garden diary is really useful here. Record how many plants you grew and roughly what you harvested. More importantly, write down whether it was actually enough.
There's little point growing twenty kilograms of sauce tomatoes if you discover nobody particularly likes tomato sauce. However, once you have made, and tasted homemade sauce, you may never want to buy commercial sauce again!
The varieties you choose need to suit our climate as well as your kitchen. Here in Central Otago, I know that my tomato season has an end point. Frost will eventually make the decision for me, so I'm interested in varieties that can ripen reliably within my growing season. Look carefully at the days to maturity when you're buying seed.
Someone gardening in a warmer part of New Zealand has quite a different opportunity and may be able to keep indeterminate plants cropping for much longer.
And don't be in too much of a hurry to plant tomatoes outside. They are warm-season plants. A large tomato seedling sitting in cold soil isn't necessarily getting ahead of a smaller plant kept warm, and growing strongly indoors*.
And just like peas, very few of my cherry tomatoes actually make it to the kitchen. There’s nothing better than picking them as I wander around the garden and eating them there and then, still warm from the sun.
Happy gardening.
* [Our September blog recommended sowing tomatoes indoors from September. If you didn't get around to it, it's now too late to start from seed, so pick up seedlings from a local garden centre or check the Food Resilience events calendar to see if there are any community plant sales near you.]
Learn how to stake or string tomato plants in Mikey’s article below on garden structures.Next month, Ali will cover everything from feeding and watering to pruning tomato plants.
—-------
Resources:
Local podcast: The Your Garden Coach podcast guides you month by month on what to do in your Southern Lakes garden! And if you sign up to their newsletter, you’ll receive seasonal tips right in your inbox.
Local workshops: Harvest Homegrown holds a range of veggie growing workshops throughout the growing season.
Harvest Homegrown also published PDF documents with all the details and tables of what to plant when and how in our climate! In particular, you’ll want to get your hands on the ‘Interplanting For High Yields & Healthy Soil’ PDF ($12)
Local videos: Dig in with Del - follow Del’s journey as she transforms her garden into her pantry. From building garden beds and filling them with soil and compost, to choosing seeds and getting everything planted, join her through a series of fun, practical videos as she grows her own food from the ground up.
Kings seeds microgreens and sprouts guide.
TIP: By the way, did you know that the Wānaka library has a seed library? They only ask you to bring some seeds back at the end of the season for other people to use.
-
Contributed by Ali Soper of Your Garden Coach.
Zucchini (Courgette): The Summer Vegetable That Just Keeps Giving
There comes a point in summer when growing zucchini stops being a gardening activity and becomes something of a management problem.
The first glossy little zucchini appears beneath the leaves and we proudly carry it into the kitchen. A week or two later we’re picking several at a time. Then we miss one for a couple of days and suddenly there’s something the size of a small torpedo hiding under a leaf. And before long we’re leaving zucchini on neighbours’ doorsteps.
They are wonderfully generous plants. Let’s take a look at their background.
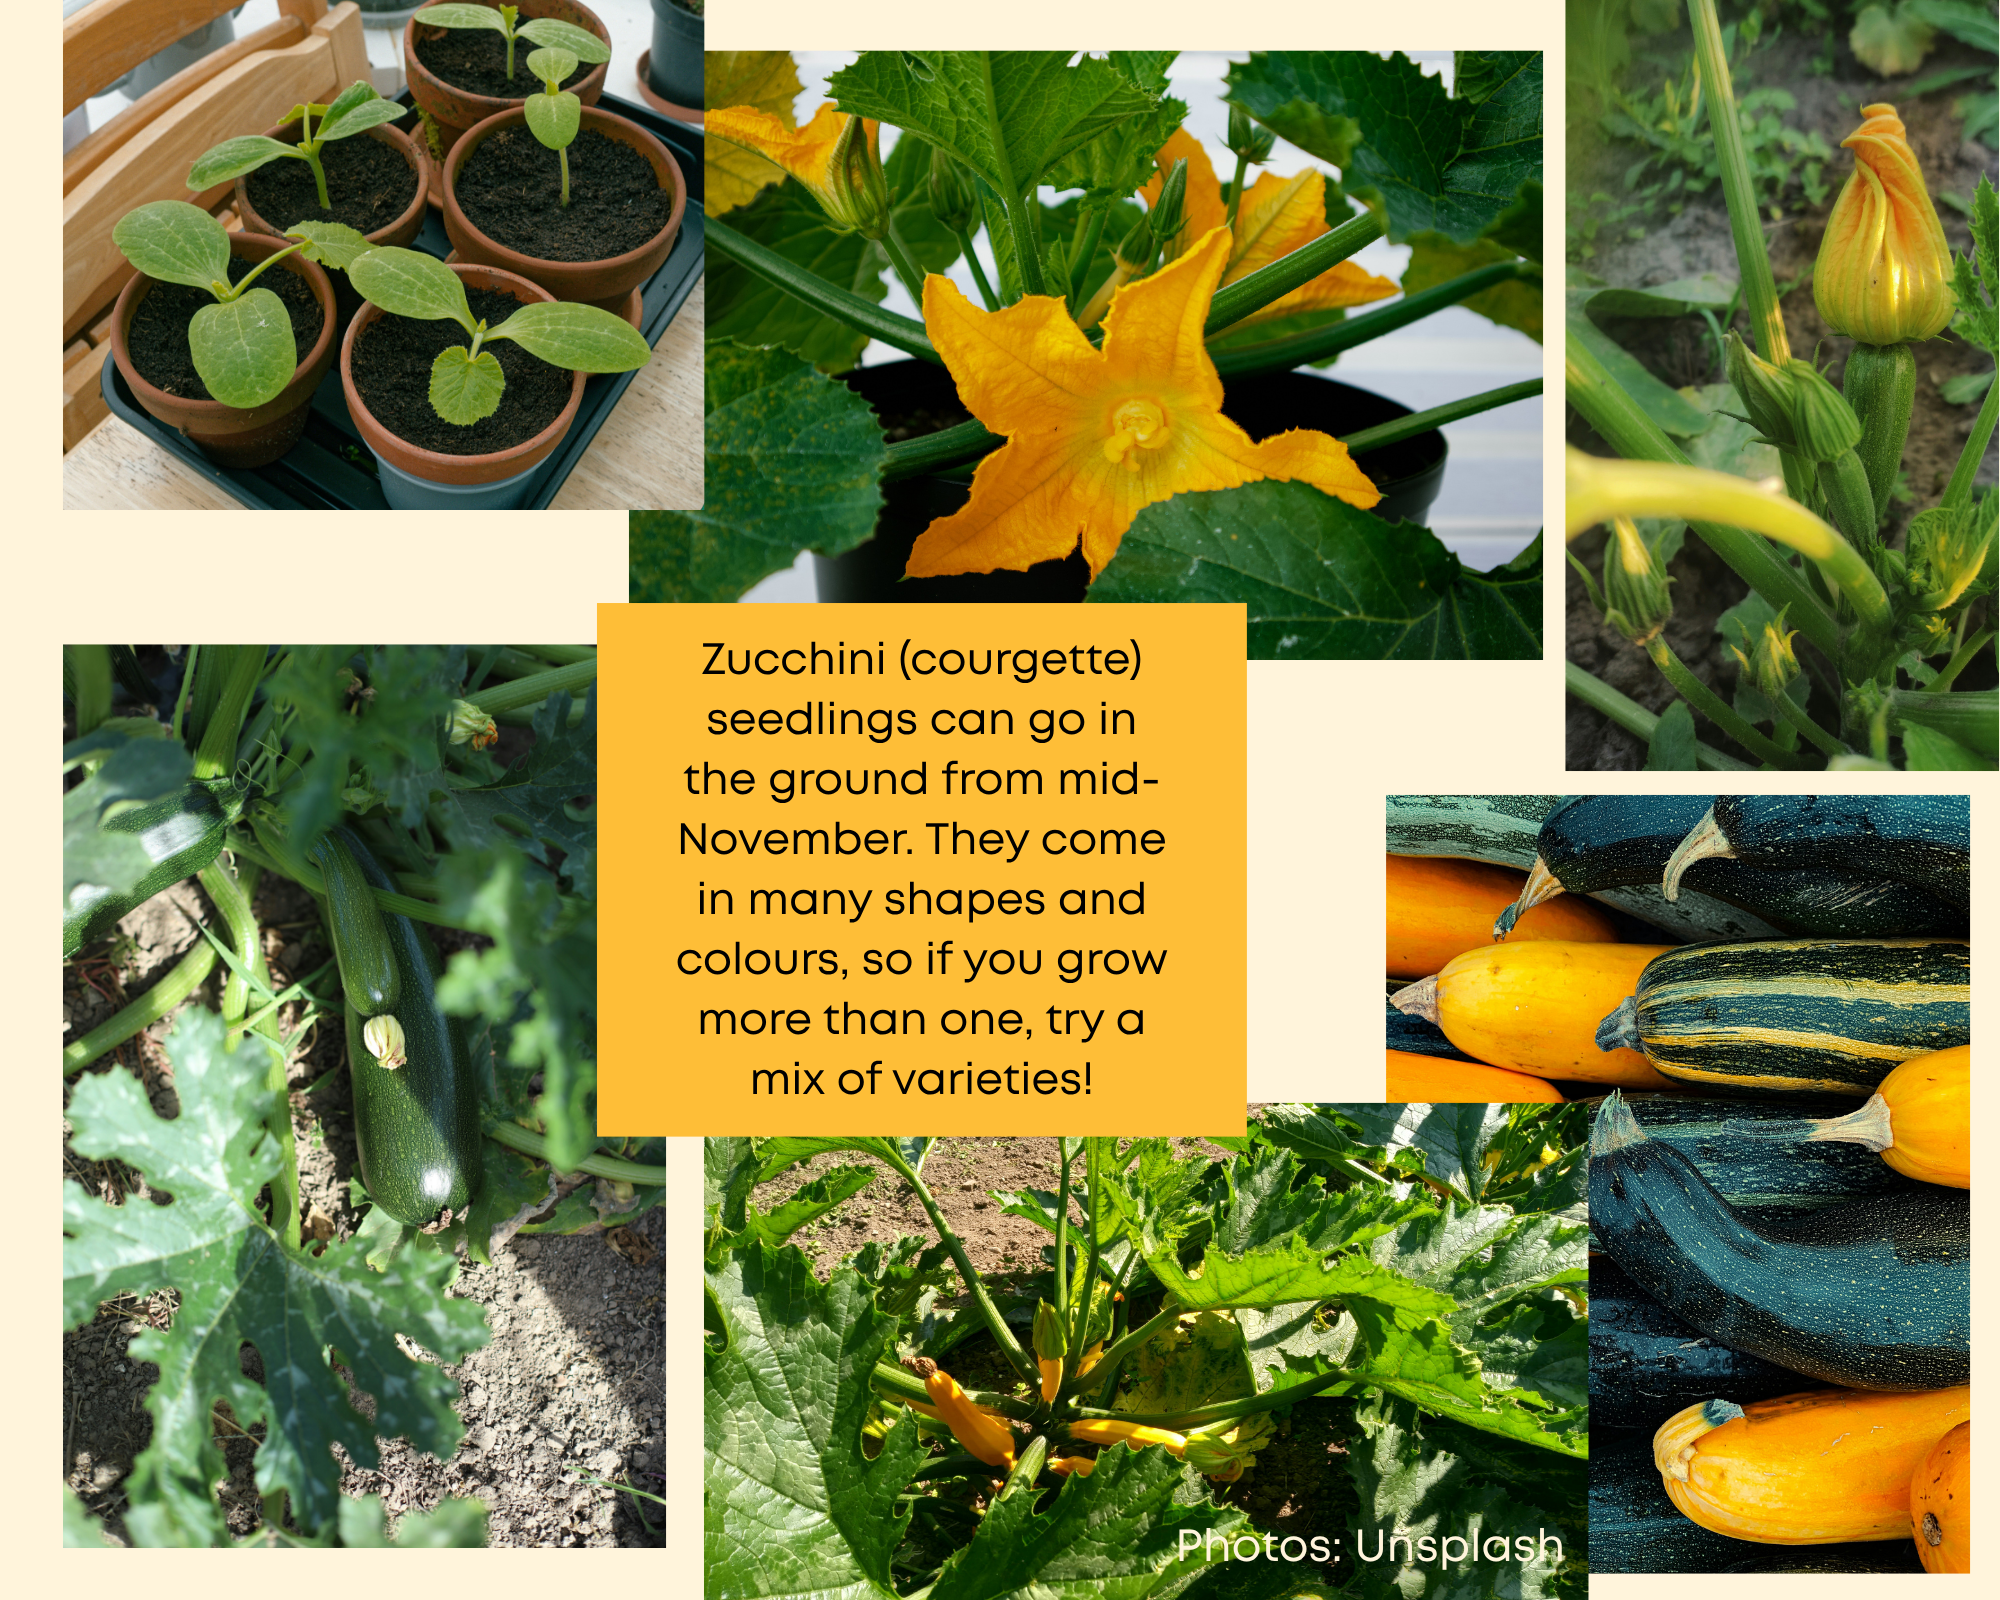
Zucchini belongs to the species Cucurbita pepo, which also includes pumpkins, summer squash and ornamental gourds. Although the word zucchini immediately makes us think of Italy, its story begins much further away. The ancestors of our modern zucchini originated in the Americas, where squash have been cultivated for thousands of years. They were important food crops for Indigenous peoples.
Squash eventually travelled to Europe following European contact with the Americas, and in Italy growers began selecting particular types for their tender young fruits. By the 19th century, forms resembling the zucchini we recognise today had developed.
Zucchini found its way into Kiwi vegetable gardens, where we discovered that one plant can apparently produce enough zucchini for an entire street.
Zucchini like summer. They are heat-loving plants and dislike cold soil, cold nights and frost. A zucchini planted too early will often sit there looking thoroughly unimpressed, while one planted a few weeks later into consistently warm soil can quickly catch up.
Understanding the microclimate in which you are growing is much more useful than simply following a date on a seed packet.
In our region, I start my seeds inside in a warm place in October [September's blog recommended sowing heat-loving crops indoors. If you didn't get around to it, local garden centres sell zucchini seedlings]. Then I wait until the soil has warmed, frosts are safely behind us and the weather is becoming reliably settled before planting outside [the SLKC suggests not earlier than mid-November]. Then I plant them in full sun with plenty of room around them.
Before planting, I like to add plenty of well-rotted compost. Zucchini are hungry plants and once they begin producing those enormous leaves and rapidly growing fruit, you can see why. They also appreciate consistent moisture. Rather than giving them a quick sprinkle every day, water deeply once or twice a week, so moisture travels down through the soil and encourages a good root system. A layer of mulch will help keep that moisture in the ground. Whenever possible, water the soil rather than the leaves. That becomes particularly important later in summer when powdery mildew often begins appearing.
One of the lovely things about growing zucchini is watching those enormous yellow flowers appear. New gardeners sometimes become concerned because the first flowers arrive, fall off and no zucchini appear. Nothing has necessarily gone wrong. Zucchini produce separate male and female flowers, and the male flowers commonly appear first. You can tell the difference quite easily. A male flower sits on a relatively thin stalk, while behind a female flower you’ll see what looks like a tiny zucchini.
For that tiny fruit to develop, pollen needs to travel from the male flower to the female flower.
Bees are particularly important visitors to zucchini flowers, and having plenty of flowering plants around the vegetable garden helps encourage them into the area.
You can hand-pollinate if necessary, transferring pollen from a male flower onto the centre of a female flower.
Good airflow helps reduce disease problems, so resist the temptation to squeeze several plants into a small space.
As the plant grows, I train it vertically up a support. This gives me more room to companion plant underneath. Marjoram and nasturtiums are my preferred friends.
When harvesting, I remove the leaves below the picked fruit. But don’t remove too many leaves. They are the plant’s solar panels and are doing an important job. The aim is simply to keep the plant reasonably open and healthy.
Once production begins, check your plants regularly. A beautiful little zucchini can turn into a marrow remarkably quickly. The occasional marrow is fine! I prefer zucchini picked relatively young. They are tender, sweet and much more versatile in the kitchen. Picking regularly also encourages the plant to continue producing.
And don’t forget the flowers. Male flowers can be harvested, provided you leave enough for pollination. They can be stuffed, battered, fried or added to salads. Pick them fresh and check carefully for insects before bringing them into the kitchen.
Of course, the inevitable happens. You push aside a leaf and discover an enormous zucchini you somehow failed to notice, despite checking the plant every day. Don’t throw it away. An oversized zucchini may not have the same delicate texture as a young fruit, but it still has plenty of uses.
Grate it into fritters, baking or pasta sauces. Add it to chutney or relish. Scoop out the centre and stuff it. Turn it into soup. If the skin has become particularly tough, peel it and remove the mature seeds. Gardeners become extraordinarily creative: zucchini bread, zucchini cake, zucchini fritters, zucchini pickles, zucchini pasta.
Zucchini are generally easy to grow, but keep an eye out for powdery mildew as summer progresses. Good spacing and airflow help, as does watering at soil level. Also learn what a healthy zucchini leaf looks like. Some varieties naturally have silvery markings which can easily be mistaken for mildew. Powdery mildew looks more like a dusty white coating sitting on the leaf surface.
Slugs and snails can be a nuisance when plants are young, and aphids may occasionally move in too.
How many plants do you actually need? Probably fewer than you think. For many households, one or two healthy plants can provide a substantial summer harvest.
If you’re short on garden space, zucchini will grow quite happily in a large container too. I'd choose something substantial, such as a wooden planter (ensure it’s untreated timber), half barrel or an old filing cabinet repurposed into a planter, rather than plastic. Make sure it has good drainage and plenty of compost-rich soil.
Containers dry out much faster than the garden, so keep an eye on watering, particularly once the plant is producing fruit. Give it full sun, support for vertical growing if you wish and, importantly, enough room for those enormous leaves to spread out.
Happy gardening!
—-------
Resources:
Local podcast: The Your Garden Coach podcast guides you month by month on what to do in your Southern Lakes garden! And if you sign up to their newsletter, you’ll receive seasonal tips right in your inbox.
Local workshops: Harvest Homegrown holds a range of veggie growing workshops throughout the growing season.
Harvest Homegrown also published PDF documents with all the details and tables of what to plant when and how in our climate! In particular, you’ll want to get your hands on the ‘Interplanting For High Yields & Healthy Soil’ PDF ($12)
Local videos: Dig in with Del - follow Del’s journey as she transforms her garden into her pantry. From building garden beds and filling them with soil and compost, to choosing seeds and getting everything planted, join her through a series of fun, practical videos as she grows her own food from the ground up.
Kings seeds microgreens and sprouts guide.
TIP: By the way, did you know that the Wānaka library has a seed library? They only ask you to bring some seeds back at the end of the season for other people to use.
-
Contributed by Mikey Dahlstrom of Millbrook Resort gardens.
As spring turns into summer and our gardens begin to fill up, we must consider which plants will require additional infrastructure to encourage optimum growth. You'll find that many of your favourite garden staples greatly benefit from some sort of support system to keep the foliage and fruit off the ground. Supporting your plants in this way will help to keep soil-borne diseases from spreading into the tender foliage, maximise airflow to inhibit fungal growth, and prevent ground-dwelling pests from stealing the fruits of your labour. These structures are best installed shortly after planting to minimise root disturbance, which is why we are covering the topic now. Here we'll discuss a few popular garden crops and how to support them.
TOMATOES
The gardener's delight! The most important consideration for how best to support your tomato plant is to know which type you are growing: determinate or indeterminate. Ali explains the difference in her tomato article in this edition (see above). In short, determinates stay compact and bushy, while indeterminates keep on growing.
Determinate tomatoes
Determinate tomatoes have a lower, bushier growth habit, which requires less support than indeterminate tomatoes do. Here are a few ways to help your tomatoes along:
Stakes: By far the simplest means of supporting your tomato plants. Simply install a stake of some description right beside your plant. You can use anything tall and sturdy you might have lying around: old posts, rebar, wooden stakes, thick bamboo and waratahs work just fine. The key here is to make sure that it is nice and sturdy, and deep enough in the ground to support a few kilograms of weight while leaving at least a good 1.5 metres above ground. As the plant grows up, you can secure it to the stake. Pop a stake cap or an old tennis ball on top of rebar and waratahs, as their sharp ends sit right at eye height when you're bending over your plants.
Cages: Tomato cages are readily available at most garden centres. Essentially you put the cage right over the top of your tomato plant, and as it grows up, the conical shape of the cage allows the plant to bush out towards the top while supporting the lateral arms. If you're crafty, you might have a go at creating your own tomato cages using deer fencing, wiring, or whatever else you can come up with!
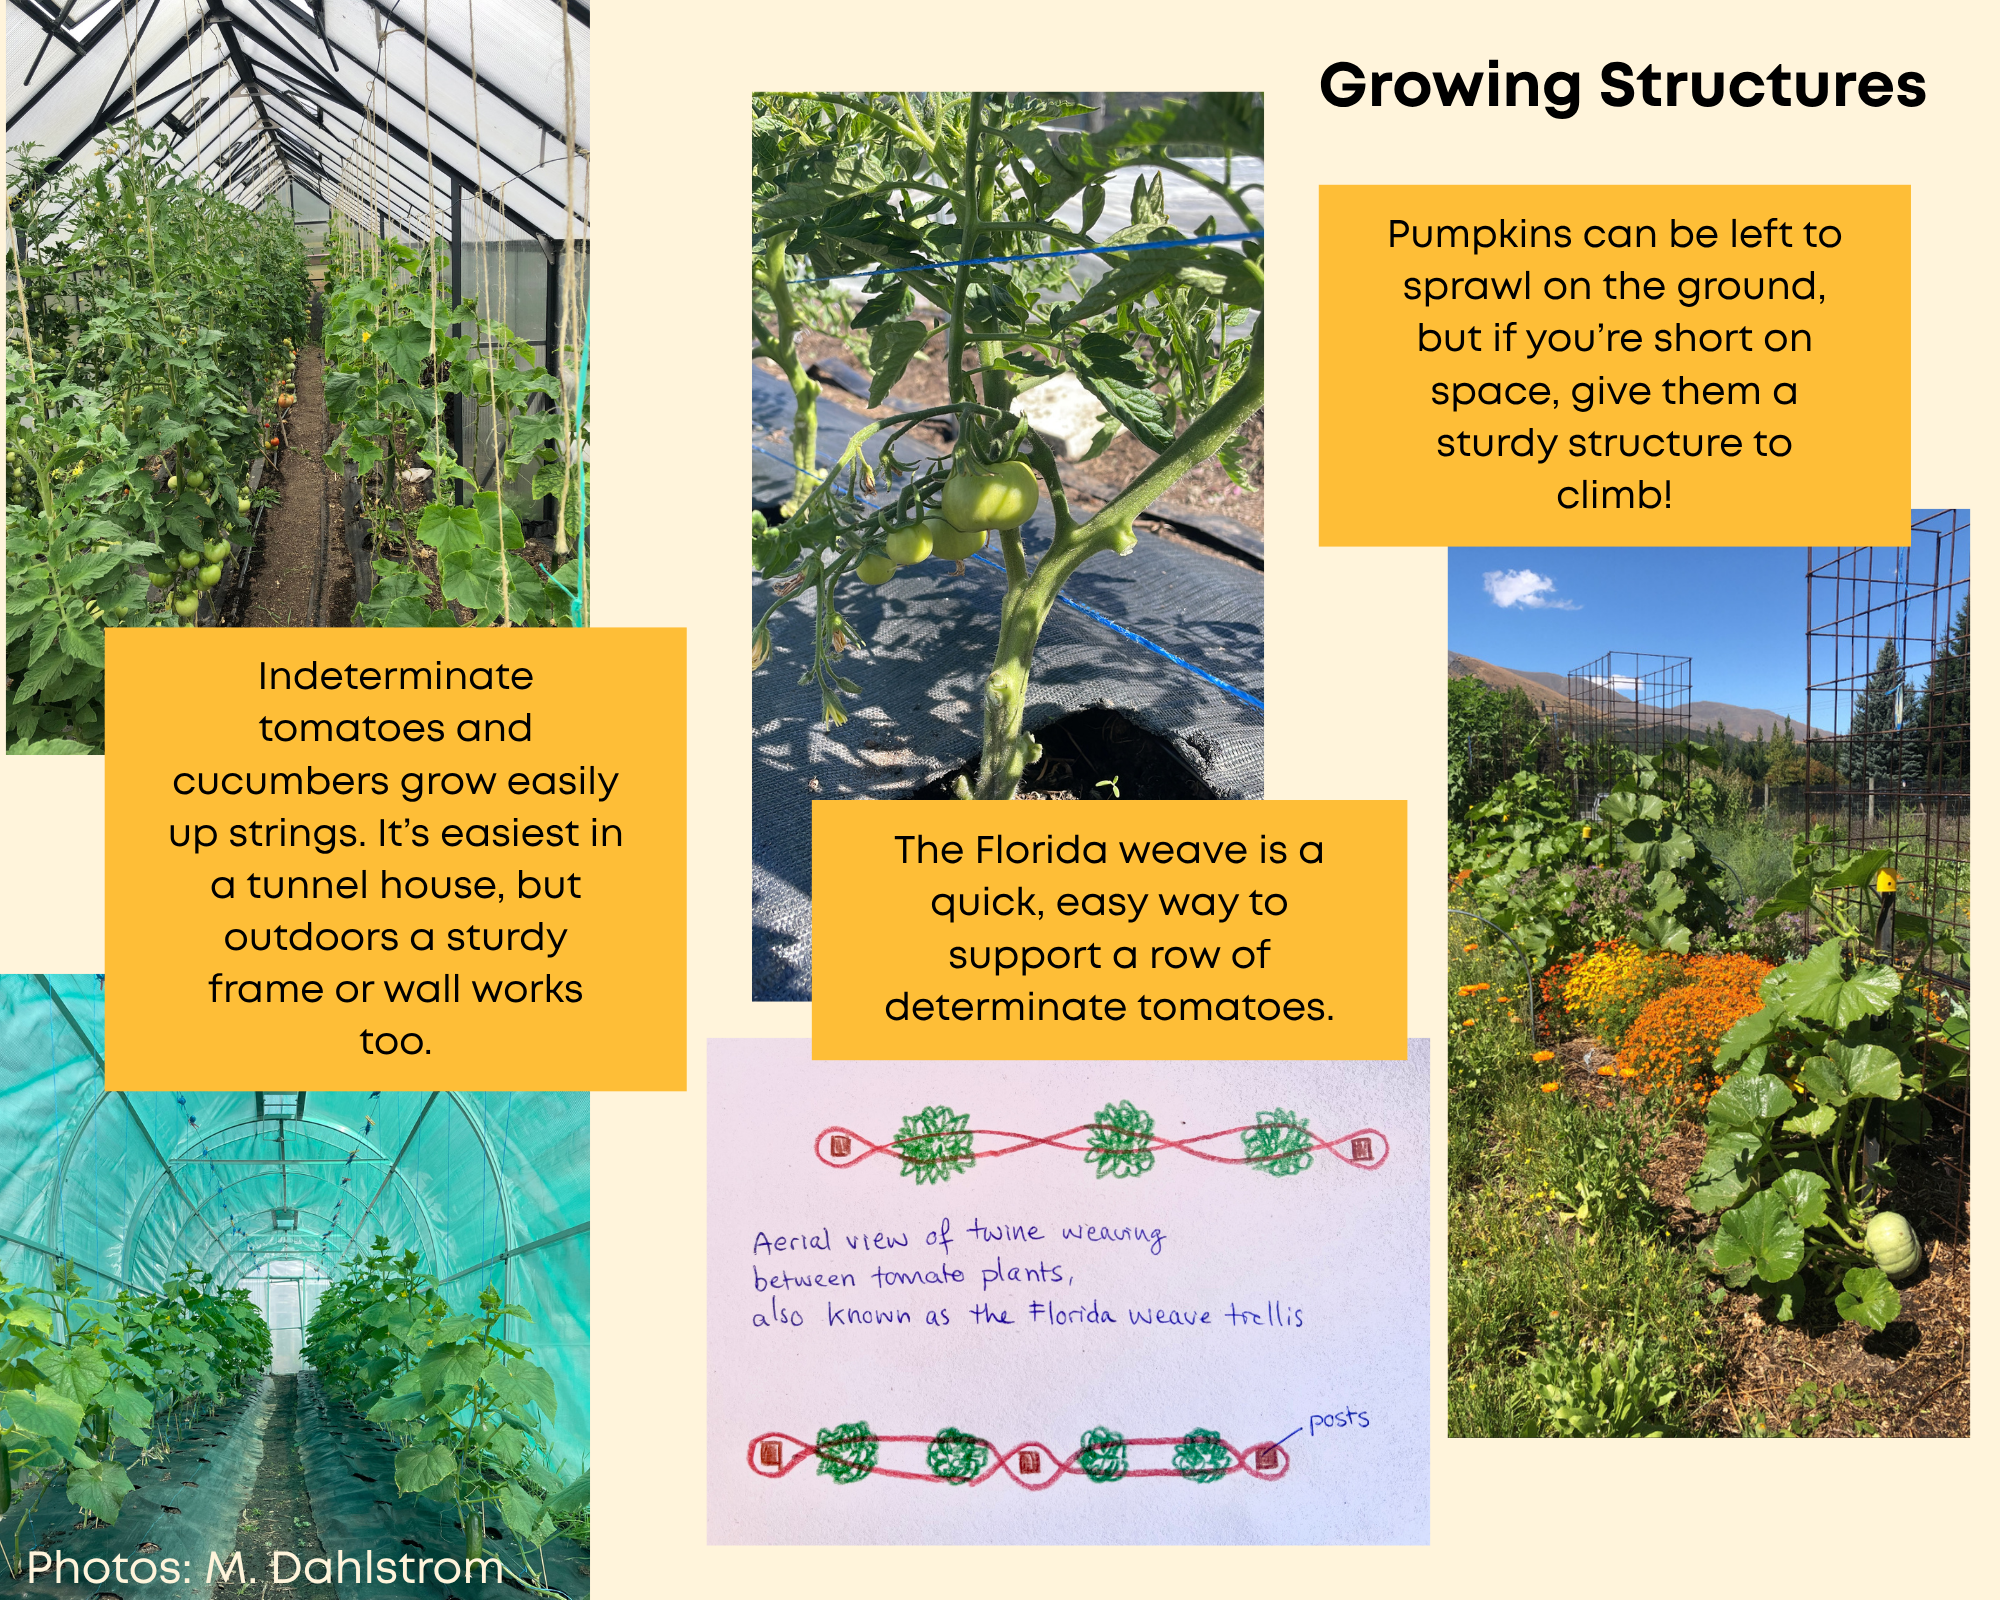
Florida weave: If you are growing multiple tomato plants in a row, the Florida weave is a quick and easy way to get them all supported in one go. Drive sturdy waratahs in at each end of the row and roughly every 3 metres along it, leaving at least 1.5 metres above ground. Tie strong (and ideally biodegradable!) twine low on an end waratah and weave it along the row, passing behind the first plant, in front of the next, and so on. Pull it taut, wrap it around the end waratah a few times, then weave back the opposite way, so each plant ends up sandwiched between two taut lines. As the plants grow, add another level of twine every 30cm or so. I use this method for my determinate field tomatoes and it works like a charm.
Indeterminate tomatoesIf you are keen to grow big, beautiful, multicoloured beefsteak tomatoes, you will most likely be growing an indeterminate variety. Many cherry tomato cultivars are also indeterminate. These plants have a much more vigorous growth habit and require a bit more upkeep, but the reward is unparalleled!
Stakes and the Florida weave can work just fine with indeterminate tomatoes as well, but there's a catch: they must be scaled up! Outdoors, aim for supports of around 2 metres or more above ground, and go taller in a tunnel house, where plants can keep growing for longer. These techniques are adequate if you keep on top of your pruning, which Ali will cover in her tomato care article in our December edition. However, in my experience, the absolute best way to support your indeterminate tomatoes is with a simple string trellising system.
If you are lucky enough to grow your tomatoes in a greenhouse or tunnel house (see Ben's article in our September edition, this setup should be relatively straightforward:
Place small stakes firmly in the ground at each end of your tomato row and run some wire along the entire length of the bed, close to the base of your plants.
Install another length of wire to the roof or cross sections of your greenhouse, running parallel to the one at the base of your plants. If you already have a bar or pipe running the length of your greenhouse that is parallel-ish to your bottom wire, you're all set.
Bring out your sturdy garden twine and attach it to both the bottom and top wire directly in front of each individual plant, making sure it is taut but with a little wiggle room. I'd recommend leaving a metre of extra twine at the top of your trellis in case your plants outgrow it.
As the plant grows up, you can either clip or weave your plant up the trellis!
Now, if you do not have access to a greenhouse, this system requires a bit more time investment upfront, but is still totally feasible. Basically, you will need to build a support beam over your indeterminate tomatoes to which you can attach your twine. Don't be intimidated: I've seen DIY setups using old metal pipes, rebar, and even hefty PVC. The most crucial thing is that it is sturdy enough to support all of your plants while withstanding those notoriously strong winds we see in our region. Give it a crack!
BEANS AND PEAS
When shopping for your bean seeds, pay close attention to the labelling. Beans, like tomatoes, are categorised by their growth habits. "Pole" or "climbing" beans will grow upward and require some support to keep them off the ground, while "dwarf" or "bush" beans generally only grow about 40-60cm tall and usually don't require much infrastructure. Pole beans are great if you are looking to grow vertically to save space, while bush beans are low-maintenance but require you to squat down and rifle through the bushy foliage to find your harvest.
Pole beans like to grow vertically and will send out small vines which wrap around whatever they come into contact with. To support this upward growth, you can use cages, fencing, netting, or anything else that will allow the plants to grab hold and keep on climbing. A simple stake and string trellis can also work perfectly. Similar to the Florida weave, place stakes at least every 3 metres or so and run twine along the length of your bed, aiming for a line every 30cm. The beans will naturally climb up your string trellis, and if they seem to need a bit more support, you can add a line along the other side of your plants to create that sandwich effect, which I would strongly recommend. You can even use sweetcorn as a living trellis: see the Three Sisters in my companion planting article in this edition (see below).
Peas grow in much the same way as pole beans, requiring a support system as they grow upward. Any of the structures above will work for both peas and beans, although I usually opt for the stake and string trellis for its simplicity.
Dwarf beans generally don't require much support. Their low growing habit means they can usually support their own weight, but in some cases they may need a little love. If you find your dwarf beans are falling over, tying them to a couple of stakes should be sufficient. And if you have more than just a few bean plants, the Florida weave works very well.
THE (UN)FORGOTTEN FEW: CUCUMBERS, COURGETTES (ZUCCHINI) AND PUMPKINS
There is a good reason I started this article with tomatoes: if your trellising system works for tomatoes, chances are it will work for many of your other garden favourites. Cucumbers will be quite happy growing up any of the structures above. They can be left to sprawl across the ground, but this isn't recommended, as contact with the soil can lead to disease. Pumpkins can also be grown vertically, but are usually just left to sprawl on the ground without any real problems. Lastly, courgettes traditionally do perfectly well on the ground, although a layer of mulch helps act as a barrier to the soil (see Nik's article below). If you find you are getting fungal infections on your courgette plants, or want to save space, as Ali does, you can easily grow them vertically by tying the stem to a sturdy stake to increase airflow.
As always, read your seed labels carefully, do your due diligence, and stay tuned for Ali's tomato care article in our December edition.
-
Water Smarter, Mulch Better
Contributed by Nik Woolford of Natured Living.
By November, things are really starting to happen in the garden. The soil is warming, plants (and weeds) are growing fast and, in this Southern Lakes region, the spring bulbs and blossom have put on their show.
However, summer can arrive overnight with a fairly serious drying-out agenda. This summer we're heading into a strong El Niño. Earth Sciences New Zealand expects more westerly winds, bigger swings between warm and cold, spells of unusually windy weather and increased wildfire risk in Otago, all of which can dry a garden out fast.
The good news is that there's a range of ways to build in resilience to help your garden through the turbulent summer. Some gardeners even go so far as to say if it doesn't survive the summer, it's not welcome! This is fairly extreme, but generally a little understanding of your soil, some 'sensible' watering and a convincing layer of mulch will get you a long way and bring some resilience and success into your garden. Veggies and fruit do need some level of irrigation for successful cropping, and this article will get you pointed in the right direction.
Water deeply, not just often
One of the easiest mistakes to make is giving the garden a little sprinkle of water every day. It feels helpful, but often you're only wetting the top few centimetres of soil. Light summer rains, whilst lovely, can be deceptive and can fail to go deep into the soil.
The problem is this encourages roots to stay shallow, where they become more vulnerable to drying out. Instead, aim for a good, deep soak, then let the soil dry out a little before watering again.
How often will depend on your soil, the weather and what you're growing. Sandy soils dry out faster than heavier soils such as clay, and most soils around this region are either clay or alluvial gravel.
Newly planted seedlings will need more attention than established plants. Soils that have a good amount of rotted organic matter hold the key to water holding capacity. Believe it or not, the simplest way to check is to stick your finger(s) into the soil. If it's still cool and damp a few centimetres down, leave it alone. If it's dry, it's probably time to water. Wilting leaves are a good indicator that it's also time to water, and don't wait for everything to collapse dramatically: the plants may not come back. One exception: on a hot afternoon, plants often wilt even when the soil is moist, so check the soil, or look again in the morning, before reaching for the hose.
When and how to water
Morning is generally the best time to water. The soil gets a chance to absorb the moisture before the heat of the day arrives. If possible, water the soil around the plant rather than the leaves. The roots are the bits doing the work, after all.
And take your time. A slow, steady soak is much more useful than a quick blast from the hose that runs straight off the surface. For a small garden, a watering can or hose may be all you need. For bigger gardens, soaker hoses or drip irrigation can make life considerably easier. Many people choose to use the 13mm brown pressure-compensating dripper line.
Timers can be super handy, particularly if you're away, but also many of us have busy lives and may not be home to water different areas at different times. Simple tap-fitted ones work fine but can be short-lived and usually sit above ground. The more specialist solenoid valves are longer lasting and can attach to a timer that can even be controlled from your phone by Bluetooth! However, don't let the timer become the boss of the garden. Check the soil and adjust watering when the weather changes. If you can, a daily check is a great ritual, even if only for the first or last 5 minutes of the day. You get to see what's happening in your garden, what's thriving and what needs attention, and make micro adjustments. This is a far more successful way of gardening than a longer once-a-week check, but both are valid.
Save water by looking after your soil
Water conservation isn't just about how you get water onto the garden. It's also about how you keep it there. Adding well-rotted organic matter helps build healthy soil that can hold moisture while still draining well. Mulching also reduces evaporation and keeps the soil cooler.
It can also help to group plants according to their water needs. Leafy greens, celery, cucumbers and courgettes appreciate more regular moisture, while established herbs such as rosemary, sage and thyme, as well as garlic and onions, are relatively undemanding and are generally happier with less (though garlic still needs regular water while its bulbs are swelling in late spring). That way, thirsty plants get their own patch and you're not watering the whole garden because one corner needs it, while plants that cope with drier conditions can fend for themselves.
And if you have the space, collecting rainwater is a great way to make use of the free stuff falling from the sky. Also, despite our massive lakes and major rivers, water restrictions can apply during dry periods, and they can change depending on conditions (QLDC water restriction page).
Mulch before summer really kicks in
Mulch is one of the simplest things you can do to make your garden more resilient over summer. It helps to:
hold moisture in the soil
keep roots cooler
reduce evaporation
suppress weeds
add organic matter as it breaks down.
There is a small timing trick, though. Let the soil warm up first (as mentioned in Mikey’s spring prep on warming soil in our September edition). Mulching cold soil in early spring can keep it cold for longer, which isn't particularly helpful when you're trying to get things growing. A little bit is still good, as it helps suppress some weeds.
Once the soil has warmed and your summer crops are planted and growing well, usually from late November, it's a good time to really get that protective layer down, around 5 to 10 cm deep (read up on soil health in our June edition). Before summer mulching, give the garden a good deep watering. Then cover the soil, rather than the plants.
What makes good mulch?
For vegetable gardens, there are plenty of options. Pea straw and lucerne are useful around many vegetable crops and break down gradually. Compost is brilliant if you have plenty of it, as it adds organic matter as well as covering the soil. Autumn leaves and grass clippings can be used too, but compost them first rather than piling them fresh around plants (see Ben’s compost guide in our June edition).
Whatever you use, leave a little space around plant stems and crowns. You want the soil covered, not the base of your plants buried under a damp blanket.
A little preparation goes a long way
The Southern Lakes summer climate can be tough on a garden. Warm temperatures, dry air and those sneaky drying winds can pull moisture from the soil surprisingly quickly. The aim isn't to keep everything permanently wet. It's to get water down into the soil, encourage good roots, and then keep that moisture there.
So before summer gets properly underway, have a poke around your garden.
Check the soil rather than guessing. Water deeply when it needs it. Get some mulch down once the soil is warm. And then, hopefully, spend a little less time dragging a hose around and a little more time sitting in the garden enjoying what you've grown.
Thoughts on greenhouses
So you have a greenhouse or tunnel house? These little beauties are a great help but need some extra thought, as they don't receive any natural rain and are fully reliant on us monitoring and responding to their needs (see Ben’s article on greenhouses and tunnel houses in our September edition).
Firstly, get the soil right, as discussed above.
Secondly, have two options for irrigation. Drip is good, but with no rain it's nice to have the option to overhead water from time to time (be careful not to overdo this, as it can create fungal issues).
Thirdly, heat fluctuations can be extreme. Have some way of creating shade and getting rid of hot air with some air flow. The extreme heat can be too much for plants, especially seedlings. The soil warms up quickly and the water transpires too fast, which can be problematic.
Generally speaking, water is one of the essential ingredients to success. Get it right with the soil and light and you can call yourself a gardener!
-
Contributed by Mikey Dahlstrom of Millbrook Resort gardens.
What is companion planting?
Companion planting is a growing method which allows gardeners to plant multiple crops with complementary growing habits very closely together in order to maximise harvests, deter pests, attract beneficial insects, or otherwise boost productivity in tight spaces. While there are many different combinations to choose from, here I will cover just a few of the more popular companion planting options so you can get a feel for the premise. From there, I encourage you to experiment and see what works in your own garden, based on what you plan to grow this season.
The Three Sisters: corn, squash and beans
Personally, I find the Three Sisters to be the top flagship example for just how effective and practical companion planting can be. This method was developed by Indigenous peoples of the Americas, and its name comes from Haudenosaunee (Iroquois) tradition. It is still widely popular to this day. Here's a simple breakdown:
Corn seed is planted directly into the ground once the soil has warmed, from around mid-November (transplants work too, but corn generally does better directly seeded as it has sensitive roots, so take care when planting).
After 3-4 weeks, once the corn has had a nice head start, pole or climbing bean seeds are sown directly beneath the corn seedlings, maybe 1-2 per plant.
Once the beans have sprouted, plant out well-grown squash, courgette or pumpkin seedlings just to the side of your line or bunch of corn. By this point it's late December, and our growing season is short, so seedlings give these plants the head start they need to ripen before the autumn frosts. Courgettes crop fastest, if you'd rather play it safe. Make sure you give them adequate space to grow so as to not shade out your corn and beans.
In effect, the corn will serve as a trellis for your climbing beans to grow up. In turn, the beans fix nitrogen into the soil, which feeds the hungry corn, though most of that benefit comes later, as the bean roots break down. Finally, your squash or courgette plants will help to shade the soil beneath the other sisters, which helps to retain moisture and suppress weeds. The only major caution when it comes to the Three Sisters is to not get too ambitious, as squash plants can get quite large. Try dedicating a small space on the edge of your garden to just a few corn and bean plants alongside your squash instead of chucking them down all about.
Tomato and basil
Tomatoes and basil are some of the most coveted crops for vegetable gardeners. Every year, I know I look forward to my first harvest of these two garden gems and the mouthwatering caprese sandwich I'll make the second I knock off work.
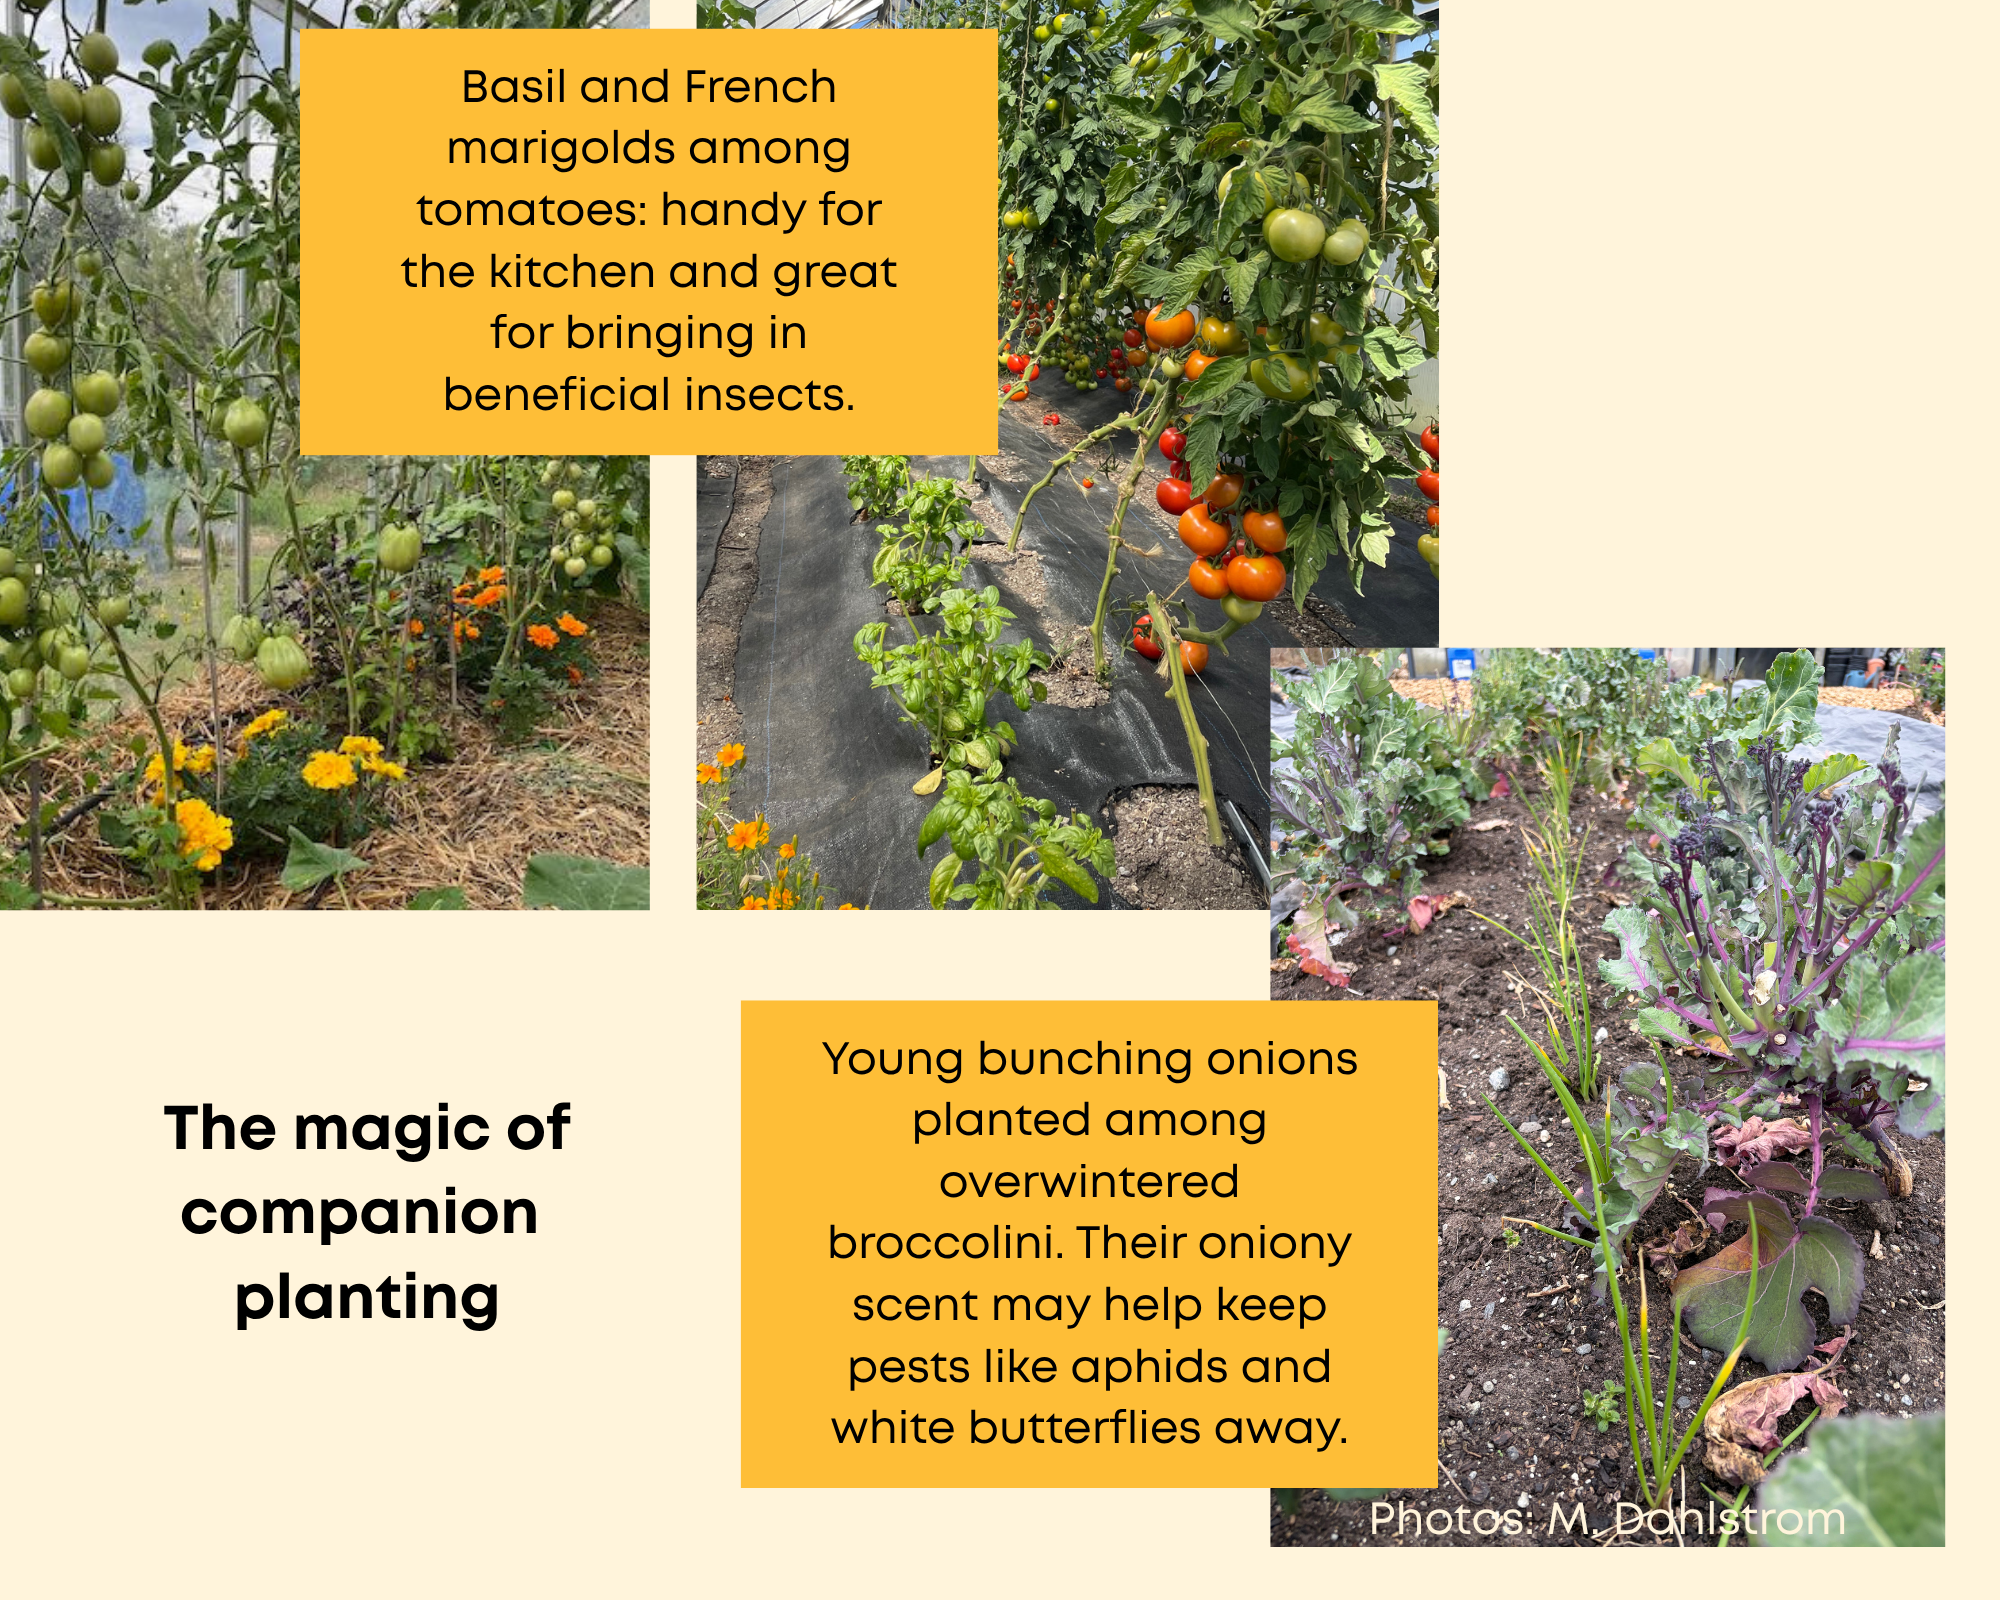
These two crops have complementary growing habits and properties, but are also commonly used together in many dishes, so it just makes sense to grow them next to one another! Might as well grab a handful of basil to go along with your juicy homegrown tomatoes while you're out reaping the benefits of your hard work, eh?
How closely you want to plant these two companions largely depends on the variety of tomato you're growing. For indeterminate tomatoes grown up a trellis, you can get away with planting basil on either side of each plant, or in the gaps between your plants, at about 20-30 cm apart from your tomatoes and any other plants you have growing in the space. Make sure to prune off the bottom leaves of your indeterminate tomatoes as they grow upwards to allow sunlight to reach the basil.
For determinate tomatoes supported by stakes, maybe consider planting your basil on the sunnier side of the tomato plant, or between the gaps in your tomato row at the same spacing. This spacing allows the low-growing basil plants to grow into the otherwise unoccupied spaces between your tomato plants, maximising your overall yield from a smaller space.
Basil also has some great pest deterring properties that will help to minimise minor infestations. Many garden pests such as aphids, mites and thrips are known to be repelled by the strong oily aroma emitted by maturing basil plants, although people report varying degrees of effectiveness. While the basil's aromatic properties do help to repel these pests by creating a scent barrier, it is by no means the end-all solution and you should still be vigilant.
Alliums and marigolds as vegetable companions
Alliums (the family of onions, garlic and shallots) have a similar effect to basil in that their strong, unmistakable oniony scent may help to confuse potential pests. Plus, their small root zone allows them to be planted relatively closely to other crops.
To utilise the pest-deterring properties of alliums, try planting some in close proximity to some of these more vulnerable crops:
Broccoli and cabbage: Many pests are attracted to the soft leafy greens of brassicas, but in our region the three big ones to worry about are slugs, aphids and white butterflies. Try sandwiching your big brassica plants between some groups of chives, spring onions or bulb onions to create a scent barrier that may help to repel these unwanted visitors. Alliums can withstand partial shade, but it's best to leave about 20-30 cm of space.
Carrots: The carrot rust fly is a tiny, low-flying insect that hatches voracious little larvae which burrow into the soil and eat away at carrot roots. They become particularly active once carrots are either thinned or harvested, enticed by the sweet scent. To mask this attractive scent, try planting some spring onions between your rows of carrots, or plant your bulb onions in close proximity.
Marigolds work in much the same way. The ones usually grown as companions are French marigolds (Tagetes patula), which are thought to deter some pests, and their roots can help suppress some soil pests called nematodes. Plus, these bright flowers look great in the garden and will help to attract pollinators and other beneficial insects. Some marigolds can grow quite large, so it's best to plant these flowers along the edges of your garden beds. If you'd like flowers to eat, grow calendula (Calendula officinalis), also known as pot marigold, a different plant whose petals can be used in salads, sauces or as a garnish. Signet marigolds (Tagetes tenuifolia) are also edible. French marigolds are sometimes eaten too, but they're quite bitter, so calendula or signet marigolds are the better choice for the kitchen.
There are dozens of different companion planting options, so I encourage you to experiment with some this season to see what works for you!
-
Low cost gardening tips
Save and swap seeds
Buy and share seeds (for example if you only need a handful of seed potatoes, share a whole bag with your friends/neighbours)
Grab a few seeds from your library! The Wānaka Library for example has a seed library - they only ask you to bring some seeds back at the end of the season for other people to use.
Ask your neighbours and friends to share perennial offcuts / clumps with you.
Collect free compost materials
Borrow gardening books from your local library
Share tools
Join community gardens
Join gardening clubs
Reuse materials creatively (keep in mind that ideally, you want non-toxic materials near the food you grow!): For example, look for pallets stamped HT (heat-treated) rather than MB (methyl bromide fumigated) - HT pallets are great for building raised garden beds. Many wineries and orchards regularly get rid of their old fruit nets - get in touch with them to see if they could give you some bits to re-use. Wastebusters has a 'garden' section where you can find treasures to reuse, plus secondhand pots, trays and tools worth a look.
Keep an eye on Facebook marketplace for deals or giveaways - cloche hoops, 100% wool carpet with a natural backing to suppress grass, seedling propagation equipment, irrigation material etc.
Use flattened cardboard as a free weed-suppressing layer under new garden beds
Learn about growing food successfully in our climate on Your Garden Coach podcast
Use Spring well!
In November:
Continue to observe the daylight hours your garden is now getting
Keep note of those late frost dates and zones in your garden
Have your frost cloth or cloches ready for when seedlings go outside
Harden off your warm-season seedlings for a week, then plant them out from mid-November once frost risk has passed
Read up on gardening (read our previous blogs or see our book tips below)
Take part in one of the many workshops offered by the local community gardens (check our event calendar here)
Join one of Erin's gardening workshops in Hāwea Flat
Listen to Your Garden Coach older & new episodes, in preparation for the coming months
-
Contributed by Loran Verpillot of Herbal Culture
What to harvest in November
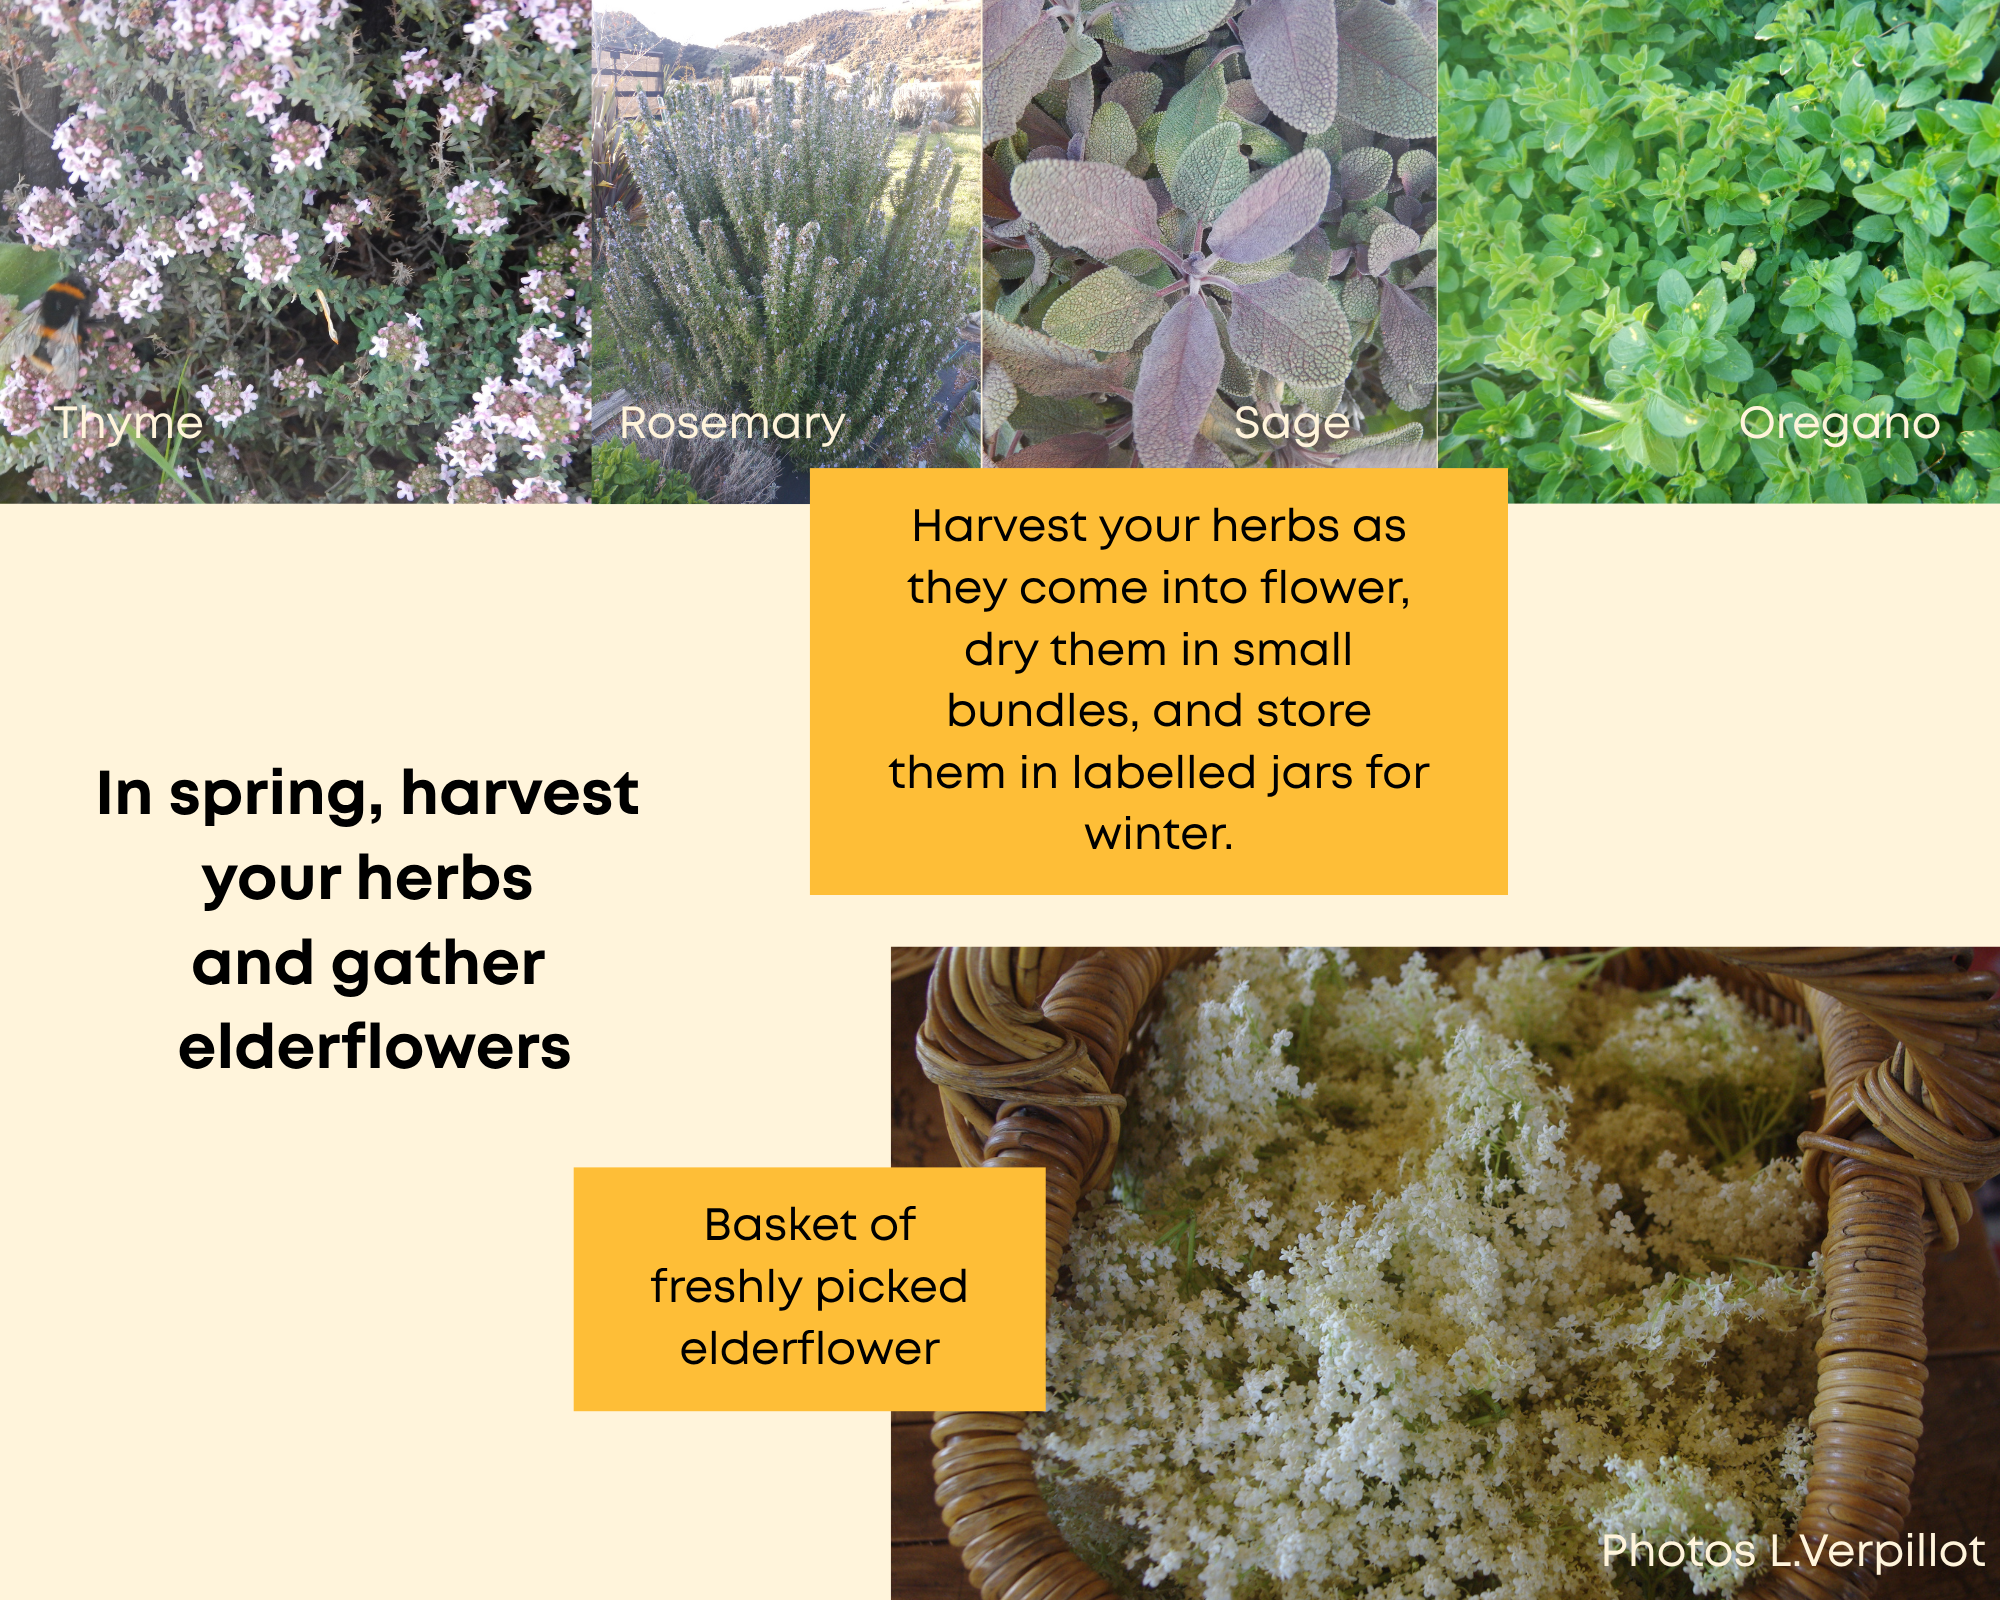
November is a wonderful time of year for harvesting herbs. The days are getting warmer, plants are putting on plenty of growth, and the garden is starting to feel wonderfully lush and abundant.
At this time of year, I particularly like to harvest aromatic herbs: the fragrant plants that we often use in the kitchen to add flavour to our food. Think sage, rosemary, thyme, oregano, chives, parsley, coriander, mint, and basil if you have it growing under cover.
These herbs are not only useful in the kitchen. Many aromatic plants have traditionally been valued in herbal medicine, particularly for supporting digestion. They also contain a variety of naturally occurring plant compounds, including antioxidants and other constituents that contribute to their traditional uses.
So, if you have these herbs growing in your garden, November is a great time to start harvesting and making the most of them!
When is the best time to harvest?
For many aromatic herbs, a good time to harvest the aerial parts (the leaves, stems and flowers) is when the plant is just coming into flower. This is often when the plant is particularly rich in its aromatic constituents, which are responsible for much of its characteristic smell and flavour.
The second-best time to harvest is when you have the time and remember to do it!
There is little point waiting for the theoretically perfect moment if the plants become overgrown or you never get around to harvesting them. Regular harvesting also encourages many herbs to produce fresh new growth (especially mint, basil, oregano and sage).
How to harvest aromatic herbs
Harvest the aerial parts of the plant when they are dry. Ideally, wait until the morning dew has evaporated before harvesting.
Try to avoid harvesting during the hottest part of the day. Mid-morning, once the dew has dried, or later in the afternoon or early evening can be good times.
Use clean, sharp scissors or secateurs and avoid taking more than you need. Leave plenty of healthy growth on the plant so it can continue growing.
If you are harvesting flowering herbs, you can include the flowers and tender stems along with the leaves.
And don't forget to enjoy the process. One of the lovely things about harvesting aromatic herbs is that you can immediately appreciate their qualities through their scent: rubbing a little rosemary, thyme or mint between your fingers releases those beautiful aromatic oils.
How to use your herbs
The easiest way to use freshly harvested herbs is, of course, to eat them! Add fresh parsley or coriander to salads and cooked dishes, use rosemary and thyme with roasted vegetables, add basil to pasta dishes, or make a refreshing mint tea.
Fresh herbs can also be used to make herbal teas, infused vinegars and other preparations.
If you have more herbs than you can use fresh, drying them is a simple way of preserving your harvest for the months ahead.
There is something particularly satisfying about opening a jar of your own dried herbs in winter and knowing that you harvested and prepared them yourself.
You could also freeze some of your herbs. Soft herbs like chives, parsley, coriander and basil keep their flavour better frozen than dried: chop them and freeze in ice cube trays with a little water or oil.
How to dry your herbs
One of the simplest methods is to make small bundles. Gather around 10 to 15 stems together and tie them with string. Hang the bundles somewhere warm, dry and well ventilated, away from direct sunlight.
Good air circulation is important because moisture needs to escape from the plant material as it dries.
Avoid making the bundles too large. If they are too thick, the inside can remain damp, which increases the risk of mould.
You can also dry herbs spread out in a single layer on a tray or drying rack. This can be particularly useful for delicate leaves or herbs with lots of moisture (like basil and mint).
Your herbs are ready when the leaves and stems feel crisp and dry and can easily be crumbled between your fingers.
Once dried, your herbs should still be green. Some herbs are delicate and can turn brown if not dried properly, especially basil and mint.
Don't be tempted to store them before they are completely dry. Even a small amount of remaining moisture can cause mould to develop during storage and make them unusable.
How to store dried herbs
Once completely dry, your herbs can be stored in airtight glass jars. Glass jars filled with herbs look so beautiful lined up in the kitchen or in your herbal cupboard. Store them out of direct sunlight.
Brown paper bags are another option, particularly if you're not completely sure your herbs are fully dry, as paper lets any remaining moisture escape.
Whichever method you choose, label and date everything. Once herbs have been dried, many of them start to look remarkably similar. It can be surprisingly difficult to remember which jar contains which herb a few months later.
The older the herbs, the less flavour they will have.
Growing herbs in small spaces
You don't need a large garden to grow your own aromatic herbs.
Many culinary herbs grow happily in pots, containers or window boxes, making them ideal if you have a small garden, balcony or courtyard.
Mint is particularly well suited to growing in a pot because it can spread very enthusiastically if planted directly in the garden!
A small collection of pots containing thyme, rosemary, sage, oregano, mint and basil can provide you with a surprisingly abundant supply of herbs throughout the growing season.
And harvesting regularly means you can enjoy fresh herbs while also having some to dry for later.
Foraging aromatic herbs
Some aromatic herbs can also be found growing outside cultivated gardens. Mint, marjoram and wild thyme (which covers many Central Otago hillsides) can sometimes be found growing in suitable places, and rosemary is often planted in council reserves.
However, only harvest a plant if you are completely confident about its identification. There can be plants that look similar but have very different properties, so correct identification is essential.
It is also important to think about where you are harvesting from. Avoid areas that may have been exposed to pollution, herbicides, pesticides or other contaminants. This includes places beside busy roads and areas that may be sprayed or treated.
In particular, be cautious around roadsides, public paths and other council-managed areas. If you are unsure whether an area is sprayed, it is better to leave the plant and find somewhere you know to be safe.
And, of course, always consider whether you have permission to harvest from the land.
A little harvest goes a long way
One of the things I love about growing and harvesting herbs is that you don't need a huge amount to make a difference.
A few handfuls of herbs from the garden can provide fresh flavour for your meals now and dried herbs for use later in the year.
So, as your garden becomes increasingly lush this November, take a moment to look at your herbs. Which ones are coming into flower? Which ones could do with a trim? And which ones could you harvest and preserve for winter?
A little time spent harvesting now can give you a wonderful supply of herbs to enjoy throughout the year.
-
Contributed by Loran Verpillot of Herbal Culture
As spring comes to an end, elder trees burst into flower. Here in Aotearoa New Zealand, elder (Sambucus nigra) generally starts flowering towards the end of November, although the timing can vary from year to year depending on the season and where the tree is growing. The flowering season can continue into December and January in places.
The flowers form beautiful, delicate creamy-white clusters, often filling the air with their distinctive sweet, slightly musky scent.
Elder is a wonderful plant to get to know if you are interested in foraging and herbal medicine. The flowers can be used fresh or dried and have a long history of use in traditional herbal medicine.
Getting to know elder
Elder (Sambucus nigra) is native to Europe, western Asia and North Africa and was introduced to Aotearoa New Zealand in the 19th century. It is now naturalised here and can be found in many parts of the country. It is particularly common in the South Island, although it is also found in the North Island.
Elder is a shrub or small tree and can grow to around 6 metres tall. It has greyish bark and distinctive leaves made up of several leaflets. The flowers appear in large, flat-topped clusters.
It is quite an adaptable plant. You can find elder growing around old buildings, sheds, hedgerows, roadsides, forest margins and other disturbed areas. It seems to particularly enjoy fertile, moist soil and a little shade, although it can grow in less favourable conditions too.
When to harvest elderflowers
The best time to harvest the flowers is when the flower heads are beginning to open. You don't need to wait until every single flower has opened. In fact, I usually look for flower heads where around two-thirds of the tiny flowers are open and the rest are still in bud.
Choose a dry day if possible, ideally after the morning dew has dried. Use clean scissors or secateurs to cut the flower heads.
When harvesting, remember that the tree and the flowers are also providing food and habitat for insects. Don't take everything from one tree. Leave plenty of flowers behind, both for pollinating insects and so that the tree can go on to produce berries later in the season (which birds and people love).
I also like to give each flower head a gentle shake before putting it into my harvesting basket, as many tiny black insects love to live in the flower head.
As with all foraging, make sure you are completely confident in your identification and only harvest from clean areas away from roadsides, sprayed areas and other potential sources of contamination.
Processing elderflowers
The elderflowers can be used fresh or dried.
If you are drying them, first remove as much of the thicker green stem as you can. The flowers themselves are the part traditionally used in herbal medicine, rather than the stems, leaves or bark. Elder contains cyanogenic compounds in some parts of the plant, so it is best not to deliberately include stems and other plant parts when preparing elderflower for consumption.
I usually use scissors to snip the individual flower clusters away from the thicker stems. You don't have to remove every tiny piece of stem, but remove as much of the larger stalk as possible.
Spread the flowers in a thin layer somewhere warm, dry and well ventilated, out of direct sunlight. Once completely dry, store them in an airtight container or a brown paper bag, away from light and moisture. (For more drying and storage tips, see my article on harvesting aromatic herbs, above in this edition.)
What can you do with elderflowers?
Fresh elderflowers can be used to make elderflower cordial or elderflower fizz, and there are many recipes available online. They can also be added to herbal teas while fresh, although their delicate flavour and aroma can be particularly useful when the flowers are dried and combined with other herbs.
Dried elderflowers make a lovely addition to a herbal tea blend. They have a gentle, aromatic flavour and work particularly well alongside herbs such as peppermint, yarrow (see my spring weeds article in our September edition) or lemon balm.
A little respect for the elder
Elder is one of those plants that offers us something at several different times of the year. In late spring and early summer, there are beautiful flowers. Later, the tree produces its characteristic dark berries, which have their own long history of culinary and traditional use (find out more in our upcoming February blog!).
Always remember when foraging: take what you need, leave plenty behind, and harvest with care and respect.
—--------Food resilience is not only about what you grow or store. It is also about noticing what food already exists around you. Local foraging knowledge helps households identify seasonal wild foods, fruit trees, herbs, nuts, mushrooms and edible weeds in our landscape. Building this knowledge increases confidence, reduces waste, saves money and reconnects people with place.
Even learning a few safe, abundant species each season can meaningfully strengthen household food resilience.
Start small and safe:
Learn correct identification
Avoid sprayed or polluted areas
Take only what you need
Leave plenty for others and nature
Never eat wild plants or mushrooms unless identification is certain.
Resources:
If you are new to foraging, it is important to learn identification from trusted sources and local guides before eating any wild plant.
iNaturalist NZ (best overall for accuracy + community verification)
https://inaturalist.nz - Global platform with a strong NZ community of botanists and ecologists. You upload photos and get community-verified identifications.
Seek by iNaturalist (best beginner app)
https://www.inaturalist.org/pages/seek_app - Simple, camera-based ID app that works offline and is designed for quick identification in the field.
New Zealand foraging books:
Foraging New Zealand by Peter Langlands
Edible Weeds Handbook by Andrew Crowe
The Forager’s Treasury by Johanna Knox
Central Otago Foraging Facebook page
Foraging walks are offered on a regular basis by some of our talented local herbalists such as:
Loran Verpillot from Herbal Culture (Upper Clutha)
Rochana Moon from Wise Moon Wellness (Upper Clutha)
Agnes from A Taste Of the Wild (Whakatipu)
-
Food resilience is not only gardening, it includes your household pantry. This month, two early summer crops are ready to pick and preserve: broad beans and rhubarb.
Broad beans
Back in our May and June editions, we suggested sowing broad beans for a November harvest. If you did, now’s the time to enjoy them!
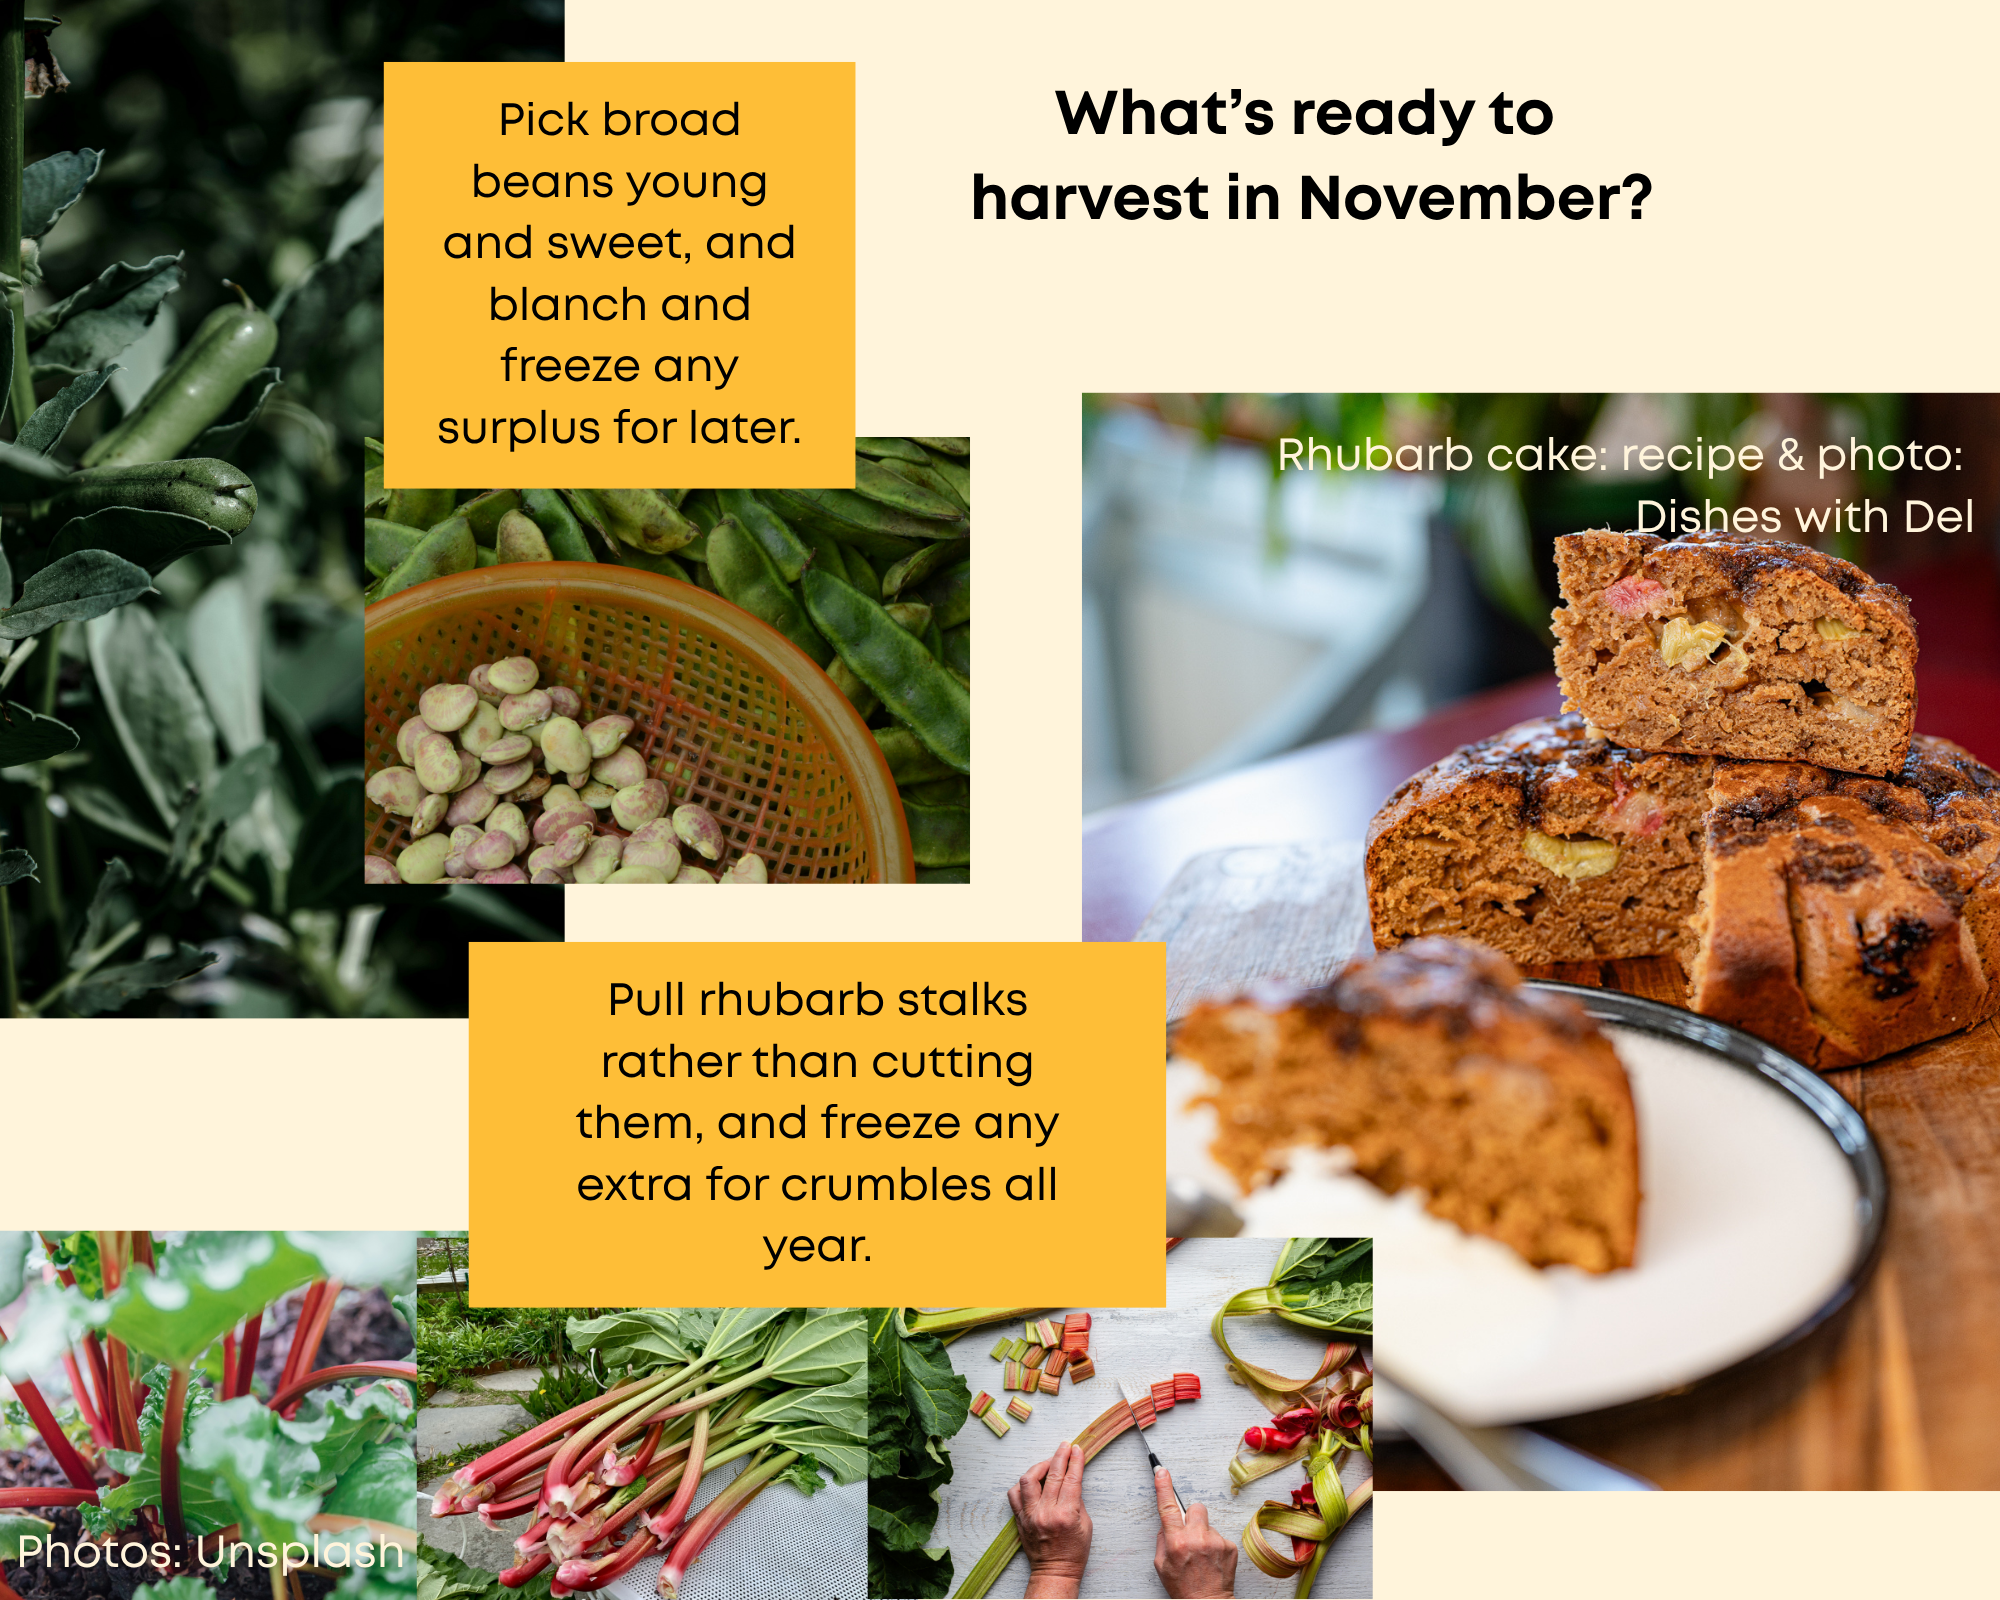
When to pick: pick the pods when they’re plump and you can feel the beans inside, but before the pods turn leathery. Young beans, around the size of your thumbnail, are the sweetest and most tender. Pick regularly, starting from the bottom of the plant, and it will keep producing for a few weeks.
How to preserve them:
Freezing: pod the beans, blanch them in boiling water for about 2 minutes, then plunge them into iced water to stop the cooking. Drain, pat dry, spread them on a tray to freeze, then transfer to bags or containers and label them. Frozen this way, they keep for many months.
Drying: if you have more than you can eat, leave some pods on the plant until they turn black and dry. Shell the dried beans and store them in an airtight jar for winter soups and stews. Save a few of the best for next year’s seed!
Double-podding: larger beans have a tougher grey skin. After blanching, simply squeeze each bean and the bright green bean inside slips out.
Podding broad beans can be a lovely, slow job to share with friends or family in the evening, rather than in the rush before dinner (Lisa’s tip!). And for a delicious way to enjoy them, try Lisa from Frog Song Farm’s broad bean and avocado dip, inspired by a Yotam Ottolenghi recipe.
Rhubarb
If you divided your rhubarb in July (see our July edition), remember to give new plants a year to settle before harvesting. Established plants, though, will be producing plenty of stalks right now.
How to harvest: rather than cutting, hold the stalk near the base and gently pull and twist it away from the crown. Take no more than a third of the stalks at a time, so the plant stays strong. Only eat the stalks: rhubarb leaves are toxic, but they can go on the compost.
How to preserve it:
Freezing: rhubarb is one of the easiest crops to freeze. Wash and chop the stalks into 2 to 3 cm pieces, spread them on a tray to freeze, then bag them up. No blanching needed.
Stewing: gently cook chopped rhubarb with a little sugar or honey until soft, then cool and freeze in portions. It’s ready to go for crumbles, porridge or yoghurt all year.
Fresh or frozen, rhubarb is perfect for baking. Try Del’s cinnamon and rhubarb cake from Dishes with Del.
Before summer: check your pantry and your water
Since May, we’ve been suggesting you build up 2 to 3 weeks’ worth of pantry staples. Now’s a good time to check yours: move the oldest items to the front, check use-by dates and top up anything that’s running low.
And don’t forget water. With a strong El Niño expected this summer, it’s worth having some stored drinking water at home. Civil Defence recommends keeping at least a three-day supply: at least 3 litres per person per day, so at least 9 litres per person for the three days. That covers drinking and basic hygiene. Store more if you can, as hot weather and physical activity can double the amount you need. Find out how to store water safely on the Get Ready (Civil Defence) website.
__________Look out for:
Food preservation workshops
Cooking skills events
Waste reduction programmes
Wao Food Resilience calendar of events is a good place to start
Resources:
Dishes with Del (pantry and waste reduction tips)
Dig in with Del - follow Del’s journey as she transforms her garden into her pantry. From building garden beds and filling them with soil and compost, to choosing seeds and getting everything planted, join her through a series of fun, practical videos as she grows her own food from the ground up.
WānaKai Community Cooking Group - community kitchen session, every second Friday, 11:30am-1:30pm, Wānaka Community Hub. Free, booking essential: learn new cooking skills, make new friends!
-
In December we’ll cover garlic harvesting and storing as well as how to grow healthy tomato plants with plenty of delicious tomatoes. We’ll also go over succession planting and general harvesting tips. In the foraging chapter we’ll talk about mint (perfect for those refreshing summer drinks) and we’ll have a few tips on camping cooking - or for when you only have one heat source to cook on.
-
Ali Soper: seasonal gardening advice for our region: get seasonal gardening tips through Ali’s Your Garden Coach podcastand consultations. Sign up to her newsletter to receive practical advice delivered straight to your inbox.If you’d like to join one of Ali’s monthly Garden Conversations groups, email her at coach@yourgardencoach.nz. Ali runs three different groups, with koha appreciated.
Erin Allison Harvest Homegrown: market garden, gardening guides and home veggie garden courses/workshops(Hawea Flat, Wanaka) (on Facebook)
Local workshops: Harvest Homegrown holds a range of veggie growing workshops throughout the growing season.
Erin from Harvest Homegrown also offers these localised growing PDF guides for a small fee ($9 to $12 each):
Interplanting for high yields and healthy soil, including planting plans: https://stan.store/harvesthomegrown/p/interplanting-for-high-yields--healthy-soil (this PDF guide briefly mentions how much to grow of each plan for household sizes also).
Growing from Seed: https://stan.store/harvesthomegrown/p/growing-from-seed
Planning an efficient garden: https://stan.store/harvesthomegrown/p/planning-an-efficient-garden
Printable Veggie Garden Journal: https://stan.store/harvesthomegrown/p/printable-veggie-garden-journal
Dr Compost: composting made easy as well as gardening education: online info and in-person workshops available in Upper Clutha and Whakatipu.
Community gardens: Grow Wanaka, Hawea Food Forest, The Templeton Park Community Orchard (Albert Town Wānaka),and Queenstown Community Gardenworking bees.
The Wanaka Vegetable Growers Club meets the first Wednesday of the month (apart from June and July) at St John's Rooms Linkway Wanaka at 7pm.
The Hāwea Garden Group is an informal gathering for people interested in all aspects of gardening.
Activities include garden visits, guest speakers, and hands-on workshops.
Free to join, and you’re welcome to attend whenever it suits.
Meets every second Thursday from 20 August (starting with a seed swap and seed raising session) through to 19 November.
For more information, contact Diana at mansondiana@gmail.com
Foraging walks are offered on a regular basis by some of our talented local herbalists such as:
Loran Verpillot from Herbal Culture (Upper Clutha)
Agnes from from A Taste Of the Wild (Whakatipu)
Rochana Moon from Wise Moon Wellness (Upper Clutha)
-
Most of the following books are available at the Libraries and can be borrowed for free :)
Home / small scale regenerative growing:
The Edible Backyard by Kath Irvine (NZ). Excellent for practical, year round home food production in New Zealand conditions, with a strong focus on seasonal growing, resilience, and low input systems. She takes a very holistic approach and the advice is applicable to a wide range of zones. It is focused on getting the foundations right, with simple explanations and practical, reader friendly guidance.
Square Foot Gardening 4th Edition. This is a book that often resonates with new gardeners with small spaces to grow food. There is a metric version too (One Square Meter garden)
The Abundant Garden by Nova and Yotam Kay (NZ). Excellent for productive household food systems, abundance, seasonality, and low input methods.
NZ Gardener Magazine is a great resource too.
For hyper-localised resources, we recommend:
Harvest Homegrown’s localised growing PDF guides (from $9 to $12 each):
Interplanting for high yields and healthy soil, including planting plans:https://stan.store/harvesthomegrown/p/interplanting-for-high-yields--healthy-soil (this PDF guide briefly mentions how much to grow of each plan for household sizes also).
Growing from Seed: https://stan.store/harvesthomegrown/p/growing-from-seed
Planning an efficient garden: https://stan.store/harvesthomegrown/p/planning-an-efficient-garden
Printable Veggie Garden Journal: https://stan.store/harvesthomegrown/p/printable-veggie-garden-journal
Seed sovereignty / resilience:
Koanga Institute resources and publications (NZ): Save Your Own Seeds
Foraging:
Foraging New Zealand by Peter Langlands

The Southern Lakes Kai Collective at its inception in September 2024. It has since grown to 49 members from across the district and the wider food ecosystem.
-
This guide is provided by the Southern Lakes Kai Collective (SLKC), facilitated by Wao Aotearoa. Unless otherwise noted, the text is shared under a Creative Commons Attribution-NonCommercial 4.0 licence (CC BY-NC 4.0): you're welcome to share, copy and adapt it for non-commercial purposes, as long as you credit the Southern Lakes Kai Collective and the contributor. Photos, and sections marked 'All rights reserved', are not included. Community groups are welcome to print copies and charge to cover costs. Please get in touch at kiaora@wao.co.nz
Photo credits: Images are sourced from Unsplash or shared by Southern Lakes Kai Collective (SLKC) members with permission.
The Southern Lakes Kai Collective is a think tank focused on increasing the district’s food resilience. The food growers generously contributing their time and knowledge to this gardening blog are:Adele (Del) Holland - Dishes with Del : recipes, food preserving, avoiding food waste
Ali Soper - Your Garden Coach : podcast & food garden consultations
Ben Elms - Dr.Compost (Wastebusters): compost systems, soil health, gardening workshops, etc.
Brendan Lopez - Welcome Rock Gardens (bio intensive market garden)
Bruce Thurlow - Otago Polytechnic
Diana Manson - Hawea Food Forest : Community Garden
Emberly Wetherall - Grow Wānaka : Community Garden
Erin Allison -harvesthomegrown.co.nz : Homegrown organic produce and seasonal Veggie Growing Workshops for home gardeners.
Louise Wilson - Forager & home gardener
Loran Verpillot - Herbal Culture: Medical Herbalist, forager & home gardener / orchardist
Michael Sly - Waste to Wilderness: composting and microbial soil systems
Mikey Dahlstrom - Millbrook resort food garden
Neal McAloon - Queenstown Harvest Community Garden and Bee The Change
Nicola (Nik) Woolford - Natured Living
Sydney Telfer - Aspiring market gardener / regenerative agriculture
Theo Richard - The Sherwood restaurant food gardens
-
We welcome your feedback and invite you to use this form to share your thoughts, ideas, and suggestions
More about the Southern Lakes Kai Collective mahi here.
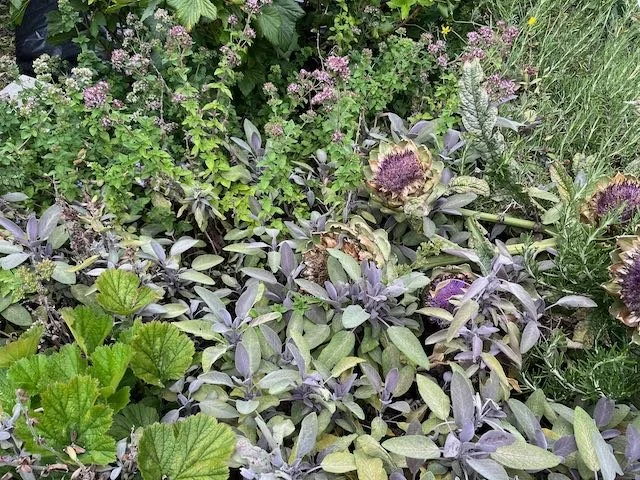
Untamed sage, oregano, rosemary and flowering artichoke plants: what a visual delight!